

Before you get on the bike after a long absence, and even at regular intervals, you should check the brakes and, if necessary, adjust them. This guide outlines how to tighten bike brakes easily, step by step with expert tips and what to watch out for.
Bicycle brakes ensure that cyclists can not only accelerate, but also reduce speed and thus get to a safe level. For the safety of the rider, the bicycle brakes must always work properly.
This is why the brake is one of the most important bicycle parts on the bike. It doesn’t matter if you’re a leisure or casual rider, commuter or athlete. If the brake does not reliably reduce the speed, it can quickly become dangerous, both in dense urban traffic and off-road. A one-time adjustment of the rim brake is unfortunately not sufficient, because the constant use and the natural wear are also difficult on this bicycle component. How to tighten a bike chain: step-by-step guide to tension and shorten
This is why cyclists must know how to tighten bike brakes, regularly check their bicycle brakes and adjust them if necessary. But how does this work and what should be taken into account when adjusting the bicycle brake
- How to tighten bike brakes: simple steps for v-brakes
- How to tighten bike brakes: Disc brakes
- How to tighten bike brakes: hydraulic rim brakes
- How to tighten bike brakes: hydraulic disc brake
- How to tighten bike brakes: mechanical rim brake
- How to fix a squeaking bicycle brake
- How to fix grinding bicycle brakes
- What are the different types of bicycle brakes?
To be on the safe side, you should therefore check your brakes at regular intervals. How often this happens depends to a large extent on the frequency of use. Recurring maintenance work includes checking the brake pads for wear and adjusting and retracting the brake. This is usually possible in three places on the two-wheeler. It’s easy to do it yourself. Special tools are not necessary. All you need is a 5-inch inbus key and a Phillips screwdriver. How to change a bicycle tube
How to tighten bike brakes: simple steps for v-brakes
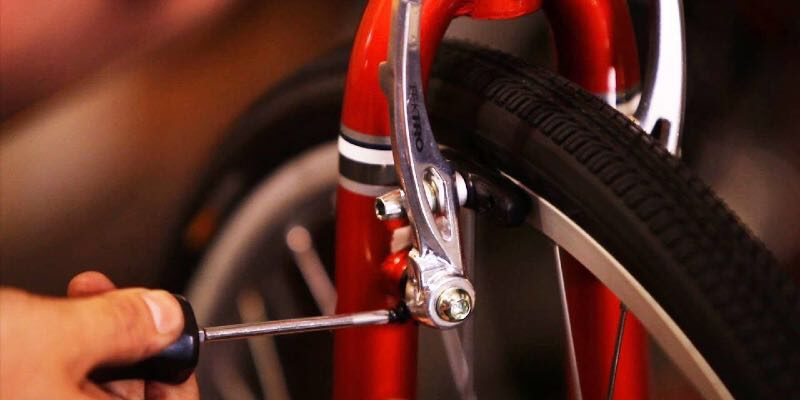
The most simple steps for how to tighten bicycle brakes apply to the v-brake. At the bottom of the brake jaws you will find adjusting screws with which you can change the distance between the rubber stamp and the rim. The distance should be the same on both sides and should be about five millimeters. Only at identical distances can the brake pads develop their braking effect simultaneously and evenly when activated.
A further adjustment option is located at the brake bars, where the cable of the rim brake is connected to the two brackets. At this point you will find an adjustable hollow screw that regulates the distance between the brake pad and the rim. This space should be about 1/12 of an inch (3 millimeters.)
The third adjustment option can be found on the brake levers on the handlebars. The adjusting screw located there is secured with a counter nut, at this point the pull is connected to the brake lever. Here you can adjust to how far you have to pull the lever until the braking effect occurs.
Normally, the brake should be set in such a way that the effect is already noticeable with a slight actuation. This saves power and you still have room for manoeuvre in the lever if emergency braking is required. Don’t forget to tighten the counter nut again after setting.
Whenever you have made changes to the bike, you should then take a small test drive. So you can get to know the changes and get used to them.
In summary, rim brakes are set correctly if they:
- have a distance of 2 to 3 millimeters from the rim.
- are parallel to the rim.
How to tighten bike brakes: Disc brakes
In the case of disc brakes, the following applies:
- The brake disc should sit absolutely in the middle between the brake pads.
- The distance between pads and brake disc is minimal – 0.2 to 0.4 millimeters depending on the manufacturer and model.
How to tighten bike brakes: hydraulic rim brakes
With hydraulic rim brakes, the distance between the rim and the brake jaw can be easily adjusted when wearable. All that is required is to recreate a adjusting screw on the brake lever, which can be used to reduce or increase the distance between the rim and the brake jaw.
If the brake pads do not have the desired position on the rim, the brake pads must be repositioned. For this purpose, the brake cylinder and brake pad must be loosened and moved up or down. Depending on the manufacturer, this can be easily regulated via a quick release.
How to tighten bike brakes: hydraulic disc brake
In the case of a hydraulic disc brake, the brake pads automatically adjust when wear. So the distance remains the same. It is important that both brake pads have exactly the same distance from the brake disc. This can be set as follows if required:
- Easily loosen the two fastening screws of the brake caliper.
- Tighten the brake and, for example, fix it with a strong rubber band.
- When closed, tighten the fastening screws evenly again – if necessary, tighten them with a torque wrench according to the manufacturer’s specifications.
- Loosen the brake lever again.
How to tighten bike brakes: mechanical rim brake
Set the bike brake – with a rim brake, two brake pads press on both sides of the rim. (Image: happycreator – stock.adobe.com)
In the case of mechanical bicycle brakes, the distance from the brake pad to the rim must also be checked from time to time. In order to adjust the distance to the desired 3 to 5 millimeters, there are three adjustment options for mechanical rim brakes:
Fixing screw for the brake pad
It can be detached and the brake pad can be moved to the desired distance. Then tighten the screw again.
Centering screw on the brake brackets
Depending on the type and model of the brake, the exact position of the screw may differ. By adjusting the screw, the brake pads can be aligned evenly to the rim.
Adjusting screw on the brake lever
This screw is located directly at the transition from the brake lever to the bowden pull. The screw is a countered hollow screw through which the pull passes. By turning out the screw, the brakes can be applied in the basic position down to the desired distance. In order to be able to turn out the adjusting screw, the counter nut must first be loosened and tightened again after adjustment.
How to fix a squeaking bicycle brake
Squeaking can have different causes with a bicycle brake:
Dirt and grease deposits
In this case, a basic cleaning with water, some detergent and a rag often solves the problem. After cleaning, it is best to take a test lap with the still damp wheel and actuate the brake several times. This removes even more dirt particles.
Bicycle brakes set incorrectly
Incorrectly adjusted brakes are also often the cause of squeaky bicycle brakes. Perhaps the brake shoes are mounted incorrectly. In this case, check that the brakes are set correctly and, if necessary, adjust the bicycle brakes as described above. (On the brake shoes, a direction of travel is indicated, which is usually marked by an arrow. The arrows must match the direction of the wheel.) How to adjust bicycle brake levers
Worn brake pads for rim brakes
If the brake pads are worn out, this can be expressed in a squeak. If the documents are already half or further worn, they should be exchanged. In case of doubt: rather sooner rather than later.
Disc brakes are new
Disc brakes must be retracted at the beginning. A squeak is normal. Once the brakes have been retracted, the problem is self-contained.
How to fix grinding bicycle brakes
If the brakes produce a grinding noise, there are two main reasonsfor this: the brakes are set incorrectly or the wheel does not sit properly in the failure end.
If the grinding occurs after the wheel has been removed and reinstalled, it should first be checked whether the wheel is properly seated in the failure end. If the wheel sits slightly wrong, it can grind at the brake.
If the bike is properly seated, cyclists should adjust the bicycle brake. Either the brake pads are too close to the rim or the brakes are not properly centered. Especially with disc brakes, a grinding noise often occurs when the brake disc is not properly centered. Here it often helps, as described above, to loosen the brake caliper and recenter it.
ATTENTION: Under no circumstances should the squeaking be fixed with oil or grease. Grease or oil on the brake surfaces cancels out the braking effect – the brake no longer brakes!
Check brake pads
If the brake pads still have grooves, and if the wear marking is still visible on the rubbers, the brake pads are still in order.
If the wear marking is either no longer visible at all, or if the grooves are only two millimeters deep, the brake pads should be replaced. New brake pads are available at retail outlets for as early as four euros.
First, the brake cable is unhooked at the top of the brake arm. Then loosen the screw directly on the brake shoe with a Phillips head screwdriver or Allen/hex key (whichever screw is on your bike) ; so you can easily remove the brake pad and replace it with a new one. Align the new brake rubber so that it sits parallel on the rim and does not grind on the tire. Then tighten the screw again and hook the brake cable back in.
Adjusting brake cables
If the braking distance is far too long, the tensile stress must be increased.
There are two ways to do this:
When driving, the braking voltage can be increased quickly and without tools by turning the adjusting screw next to the brake lever on the steering wheel counterclockwise and then countering again with the nut.
In the long term, the brake cable is adjusted by loosening the clamping screw on the brake jaws at the bottom of the impeller with a Phillips head screwdriver or Allen key (whichever screw is on your bike). Hold the brake cable. As soon as the screw is loose, the brake cable can be pulled out and thus the tensile tension can be increased. Tighten the screw again and check the brake strength.
As we outlined above, ideally, the distance between the brake pad and the wheel should be 1/12 inch or 3 centimetres when the brake is pulled.
Does the brake pull one-sided?
The fact that the brake is on one side can be seen by the fact that the brake arms move unevenly when pulling at the brake lever, or in extreme cases only one of the two brake arms moves. Then you have to readjust.
This, too, can be quickly fixed. On a small Phillips head screwdriver or Allen key (whichever screw is on your bike) at the lower end of the brake arm, the distance between the brake arm and the rim can be easily changed – until both brake arms move absolutely evenly.
Check brake cables and replace them if necessary
If a brake pull is rusted or if individual wires of the brake cable are torn, the cable must be replaced completely. However, this should be left to the professionals in a bicycle workshop.
What are the different types of bicycle brakes?
Bicycles have different types of bicycle brakes. The different types of brakes differ in where and how the brake works. The following bicycle brakes are available:
Rim brakes – With a rim brake, two brake pads press on both sides of the rim when braking.
Disc brakes – Disc brakes on bicycles work like a car. A brake disc is attached to the hub, which runs with a wheel. When braking, two brake pads from both sides press onthe brake disc.
Drum brakes – drum brakes are available on bicycles, especially children’s bikes, as a retraction brake. This type of brake is installed inside the wheel hub. When braking, two brake jaws are pushed apart and against the brake drum from the inside. Rarely are drum brakes also installed on the front wheel, for example with Holland wheels.
Stamp brake – The stamp brake is a historic type of brake that was previously used on wheels. Here, a brake block presses on the tire from above and brakes.
The most common bicycles today are rim and disc brakes. Drum brakes are usually only used as a retraction brake.
For the two most common types of brakes, rim and disc brakes, there are two different ways in which the braking force is transferred from the brake lever on the handlebars to the brake:
- mechanical
- hydraulic
Both transmission options can be combined with both rim and disc brakes. The most common are hydraulic and mechanical rim brakes and hydraulic disc brakes.
Difference in mechanical and hydraulic functioning
Mechanical and hydraulic brakes differ fundamentally in their function:
In mechanical transmission, the force is transferred from the brake lever to the brake via a bowden pull, i.e. a kind of cable pull. The driver pulls the brake sand with the brake lever over the cable pull. In the past, there were often brake rods, for example in combination with stamp brakes. Such brake rods are no longer used today, just like stamp brakes.
Hydraulic brakes work using a closed liquid system. Since liquid cannot be compressed, force is transferred to this area. If the cyclist pulls on the brake lever for a hydraulic brake, he exerts pressure on the system. This pressure is transferred to the movable brake pads using the brake fluid in the brake cylinder. They are pressed to the rim or brake disc. How to change a bicycle cassette