


Explains how to tighten a bike chain step by step, how to shorten a bike chain and expert tips for general care to make it last longer and perform better.
Over time, bike chains get longer and longer. The reason for this is the wear and tear of the individual chain links. In this practical guide, we will show you how to tighten a bike chain again.
There are many reasons for a slack or even a too tight bicycle chain. You can recognize this problem by the fact that the chain slips off the sprockets more often when you are driving, pedaling is very tedious or the gears on the bike no longer work properly.
You can find the cause by checking the bike chain. In these cases it probably no longer has the necessary tension and is visibly sagging. On the other hand, the bicycle chain must not be too tight. Then you have to use a lot more force to pedal.
How to clean a bicycle chain properly
On a bicycle with a derailleur that provides switching mechanism for the proper tension of the bicycle chain. It is different for bikes with hub gears. Regular checks of the chain links are useful here.
The decreasing chain tension is caused by the permanent stress on the links, which wear out as a result. The chain is getting longer. You can solve this problem yourself by retightening the bicycle chain. In the next section you will find out how this is done and which tools you need.
Time to properly tension the bicycle chain: If the chain on the bike comes off while riding, does not jump around properly when changing gears or if pedaling is difficult due to excessive tension, adjusting the chain tension will improve the situation. With the bike chain optimally tensioned, the next bike tour will be easy and it will be fun to ride again.
How to tighten a bike chain: when is it necessary?
Whether and when you have to tension the bike chain on your bike depends, among other things, on whether your bike has a derailleur or a hub gear. When using a derailleur system, the rear derailleur ensures that the chain is tensioned correctly. In contrast, bicycles with gear hubs occasionally need to be retightened to the bicycle chain. Because the wear of the individual chain links makes the bicycle chain longer and longer.
If the bicycle chain is too tight, greater effort is required when pedaling. The constant tension on the chain links also increases the wear and tear on the chain. You can tell that the bike chain is not tensioned enough when the chain is clearly sagging or even jumping off when riding on uneven ground. Then at the latest it is time to retension the bicycle chain. You can now find out how this can be done quickly and easily with your bike with a hub gear in our simple step-by-step instructions .
What you need to tension the chain:
- Spanner
- Torque wrench (optional)
- Newsprint / mat to put under (optional)
How to tighten a bike chain – tips and short guide
If the bicycle chain is tensioned too tightly, there is not only more effort required when riding, but also greater wear and tear on the chain. On the other hand, a chain that is tensioned too loosely can fall off more quickly. Follow our quick guide on how to tighten a bike chain to give you an overall idea, then see the detail instructions further down.
- Loosen the fastening screw on the rear wheel with a suitable wrench (see picture).
- Now pull the rear wheel evenly backwards so that your chain sags about 0.5 centimeters. The chain is optimally aligned when you can push the chain up and down a maximum of three centimeters.
- Tip: Turn the rear wheel in both directions during the tensioning process. Chainrings are never exactly round, deviations of up to one millimeter can occur.
- When the optimal chain tension is achieved, retighten the screws on the rear wheel.
- If you have a bicycle with derailleur gears, the chain does not have to be retightened by hand. This is done automatically by the integrated chain tensioner.
How to tighten a bike chain: step by step

Step 1 – prepare the bike
The first step in how to tighten a bike chain is to turn the bike upside down – don’t forget to protect the handlebar and saddle
So that you can easily access the bike chain, turn the bike upside down and place it on the handlebars and saddle. Newspaper or a doormat under the upturned bike ensures that the grips and saddle stay clean and are not damaged.
Step 2 – Loosen the screws on the rear wheel

Loosen the fastening screw on the rear axle of the bicycle

Loosen the fastening screw on the bike: step 2
The bicycle chain can be tensioned by sliding the rear wheel in the dropout . To do this, first loosen the fastening screws on the right and left of the rear axle with the open-end wrench . The screws only need to be loosened enough so that you can move the rear wheel easily.
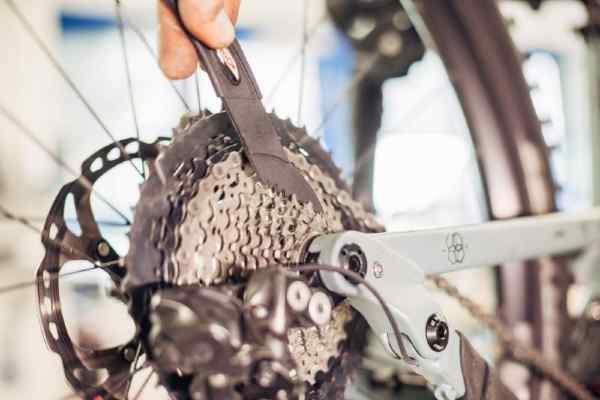
Step 3 – Adjust the chain tension
The optimal chain tension is achieved when the chain can be lifted 1.5 to 2 cm up and down by your finger without any effort (see our main image). So pull the rear wheel back in the dropout until the chain tension is optimally adjusted. Make sure that you pull the rear wheel straight back in the dropout and turn the wheel while tensioning the bicycle chain. The sprockets are not evenly round. The chain can still be optimally tensioned with the help of the rotary movement.
Step 4 – Tighten the screws on the rear wheel

Tension the chain – pull back the rear wheel
Now tighten the fastening screws on the rear wheel again. Ideally, you use a torque wrench for this , in which you set the values specified by the manufacturer and tighten the nuts accordingly.
Once the rear wheel has been screwed on, the bike and gears are ready for use again and with a freshly tensioned chain they are ready for the next bike tour!
Tension the bicycle chain with a derailleur

The chain is tensioned by the rear derailleur.
On a bicycle with a derailleur, the rear derailleur automatically ensures that the bicycle chain is correctly tensioned. There is a spring in the rear derailleur that maintains the chain tension. If the chain changes between the different sized gears when shifting, the rear derailleur compensates for the differences in length. The longer the cage of a rear derailleur, the greater the switchable range.
In bicycles with hub gears, there is usually no device for tensioning the chain. Nevertheless, a chain tensioner can also be retrofitted to a bicycle with a hub gear, which then automatically tensions the chain. For the options for installing a chain tensioner in hub gears, please contact your local bicycle dealer.
If the bicycle chain sags with chain or hub gears despite the chain tensioner, the chain tensioner may be dirty or defective. Then clean and oil the chain tensioner first. If the bicycle chain is still too loose, the spring may have broken and the chain tensioner must be replaced. In this case, contact your local bicycle dealer.
Bike chain care tips
The bicycle chain is a wear part on the bicycle that does not last forever. With the right care and careful handling, however, you can extend the life of your bicycle chain and avoid replacing it for a long time. You will find out below what you need to consider.
Tip 1 – clean the bike chain regularly
Clean the bicycle cassette

Clean the bicycle chain
Keep the bike chain and gears as clean and free of dirt as possible . Dirt particles such as grains of sand sand the links of the chain as well as the pinions and gears, which causes additional wear. A special chain cleaner is suitable for cleaning the bicycle chain . Use a small brush or toothbrush to remove coarse dirt. And with a rag it goes carefully to the fine cleaning. Also clean the bike cassette and chainrings with a brush and bike cleaner.
Tip 2 – oil the bike chain properly
By cleaning the bicycle chain, grease is lost on the individual elements. So that the chain running smoothly, oils both chain and sprocket with chain oil . But be careful: less is more – small amounts of chain oil are sufficient to supply the chain ideally. Excess oil, on the other hand, attracts dirt so that the bicycle chain will have to be cleaned again soon.
Tip 3 – Loosen stiff chain links
Check the bicycle chain regularly for stiff chain links . For example, dirt can cause individual links to become immobile – the chain then does not run smoothly over toothed wheels and other drive components, which increases the wear and tear on the chain. Putting a little chain oil on the stiff chain link often helps. In addition, move the chain section with the affected link back and forth with your fingers across the normal direction of load in order to loosen dirt. However, bent chain links must be replaced. Test ride after the chain check
You can also do something good for the bicycle chain while riding your bike. For example, be careful not to shift into a higher gear too early . Because pedaling hard in a high gear puts more strain on the bike chain than when you pedal with a higher cadence in a lower gear.
In addition, do not shift into other gears when the chain is under full load, if possible. With hub gears, it is gentle on the bicycle chain and chainring if you always briefly stop pedaling to shift gears.
How to shorten a bicycle chain
We are now going through the individual steps to shorten a bicycle chain . You will need tools and some utensils again.
- Chain tool
- Pliers to lock the chain links
- Chain lock and head pins
- wire
- oil
- Stand for assembly
First you have to open the bicycle chain to shorten it.
- To do this, you use pliers to unlock the chain lock. It replaces the outer tabs and bolts of a normal link.
- Hook the gripper of the pliers to the right and left of the lock and loosely press them together.
- If the tension of the chain is not so high, you will have less trouble.
If your bicycle chain does not have a chain lock, you can use a chain tool to open it.
- Place the untensioned chain in the carrier of the chain tool, which is further away from the twist grip.
- Now turn the handle until you feel resistance. The bolt is now in contact with the rivet pin.
- Carefully rotate further until the bolt on the chain tool presses on the pin and pushes the rivet out.
- Remove the pin from the outer tab and discard it. (To rivet the chain again later, you use new head pins.)
- Finally, remove the chain and open it by pulling with your fingers.
In the next step you remove the excess chain links. Use the chain tool to do this. Place it on the corresponding link and screw in the bolt of the rivet until the pin in the rivet slowly slides outwards. Repeat the process until the number of desired chain links has been removed .
Rivet the shortened bicycle chain back together
After the bicycle chain has been shortened, it must now be connected again.
- If you have a bicycle chain with a chain lock, you close the lock again.
- For a chain without a lock, put the ends of the chain together and use your fingers to insert a new head pin into the opening.
- Put the handle of the chain tool back in its starting position and place the ends of the chain on the carrier.
- Now guide the bolt into the chain link until the rivet pin is completely seated again.
- You can determine the correct position by briefly releasing the resistance during insertion if the pin is correctly seated.
- Move the chain up and down to check the position.
Before you ride your bike again, check the flexibility of the newly connected chain links again. You can make stiff links loose again by twisting them in all directions with your fingers. With oil you can also loosen up a stiff chain link.
Always work carefully and calmly if you want to shorten or retighten the bicycle chain. The sensitive parts in particular, such as rivets and chain links, are very sensitive. Always pay attention to the condition of an old chain. We recommend changing the bicycle chain when it is worn.
MORE INFORMATION
How to adjust bicycle brakes and pads
How to change a bicycle chain
How to change a bicycle cassette
How to teach a child to ride a bicycle