


When the drill hits a water pipe, swift damage limitation is worth its weight in gold! We will explain how to repair a drilled water pipe quickly.
It’s something that can happen unfortunately all too easily. You’re trying to install a new fitting in the bathroom, laundry or kitchen, and nothing indicated there would be water pipes behind the wall where you needed to drill. Neither sockets nor fittings betrayed any pipes in the intended location. So you marked the holes and set the new, sharp drill, and proceeded to drill through the tile, brick or stone.
Unfortunately, there is hardly any resistance when the drill hits copper or plastic pipe instead of stone. Then it only takes seconds for you, your drill and everything in the vicinity to be drenched. The water shoots out of the drilled hole for metres. So, rapid action is needed to prevent major water damage to your home.
How to pevent a frozen water pipe
TIP: If you are going to drill in a room where you think water pipes may run — or you’re not sure where they are running at all — locate the shut-off valve first and have somebody standing by it in case you hit a pipe. DO NOT turn the water off before you start drilling, as you may hit a pipe and not be aware of it. Believe us, you want to be away straight away!
Repair a drilled water pipe quickly: What are the options?
Keeping your thumb on the hole is not very promising, because in household pipes the water flows with some bar pressure. It is better to close the shut-off valve quickly. VERY quickly, in fact! The shut-off valve is often located in the same room or as the main valve near the water meter, but in the case of some houses could be outside.
Now you have to decide whether you dare to repair it yourself or whether it is better to come from a professional. In any case, the line must be exposed.
Repair a drilled water pipe quickly: galvanised, copper or plastic?
If it is galvanized, it is essential that the skilled person come. (Important: Have a price offer by telephone from emergency services and compare several companies. The differences can be huge!) Copper pipes can be repaired by you if you are trained in the handling of solder and soldering lamp. Small holes can be closed with solder. In case of major damage, the drilled pipe section should be replaced by an equally dimensioned piece of pipe. Plastic pipes are somewhat easier because you can insert a new section to replace the drilled one, and fix it at either end with external ‘sleeves’ well sealed and glued covering the cut ends.
Whichever path you take, until the necessary material is at hand or the professional is on site, some – waterless – time will pass. In fact, you may be without water for a while until the pro comes to fix it properly, some first aid should be provided.
Repair a drilled water pipe quickly: immediate first aid
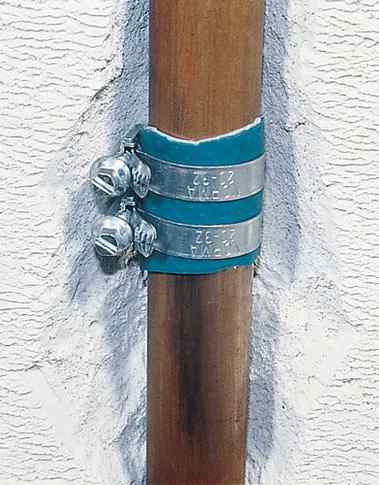
The cheapest option is to place a plastic cuff from a piece of cut hose over the hole and fasten it with two hose clamps. Another option is repair with epoxy plastic especially for metal. The two-component “kneading mass” is pressed into the hole to form the pipe and hardens after a few minutes. But these temporary solutions are only emergency solutions, which you have to replace as quickly as possible with a professional repair.
Repairing the water pipe: Quick bandage for the pipe
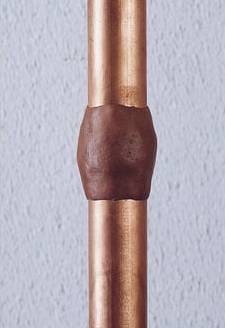
Like a plaster bandage, a cuff of two-component epoxy kneading compound is formed around the damage site specifically for metal. The material is simply kneaded to a homogeneous mass, after four minutes it begins to harden. Until the professional arrives, it can withstand the water pressure. Or you can place a rubber patch like a pressure bandage over the hole and around the pipe. With two hose clamps, it is pressed to the pipe and seals it provisionally until the expert repair can be done.
Repairing copper line: instructions for emergencies
After the water has been shut off, all the tap points of the water pipe are opened to let the pipe run out. For soldering with open flame, the pipe must be dry.
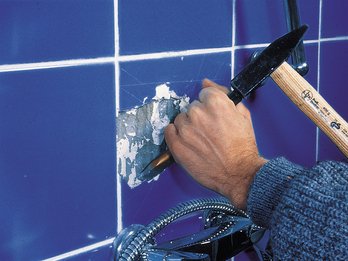
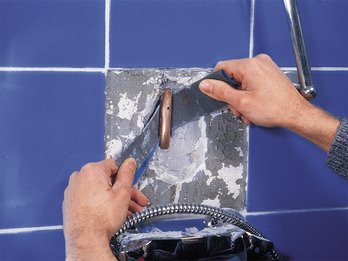
If the pipe is behind a tile, you will need to remove the tile. First, cut out or scrape out the grout in the adjacent joints so as not to damage the neighbouring tiles. Tap the tile you need to remove several times with the hammer until deep cracks appear. This makes it easier to remove with a flat chisel and hammer.
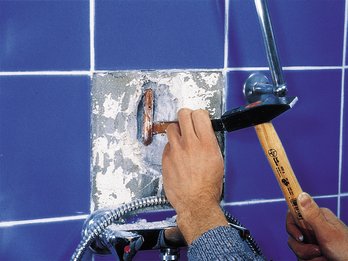
The masonry around the damaged pipe is chipped away with a hammer and chisel – even behind the pipe.
Before soldering, thoroughly clean the copper pipe. To do this, sand with a strip of sandpaper.
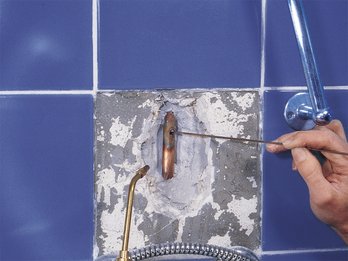
Heat the pipe with a soldering lamp until the solder starts to flow and the hole closes. If water vapour leaks, there is still residual water in the pipe, and it has to be emptied again.
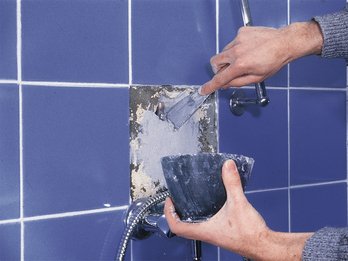
When the damage is repaired and pressure is back on the line, wait a few minutes to make sure the hole is watertight. Then fill the missing tile area with plaster. Once the plaster is hard and fully cured, you can glue and grout a new tile onto the wall.
 Gerhardt Richter is a writer and a trainer at trade technical colleges, specializing in carpentry, plumbing, mechanics and construction.