


How do you make a string art picture? Our guide outlines the easy instructions for children and adults to make these fun craft projects.
Find more craft guides, tips and advice
Find more parenting and children guides, tips and advice
String art pictures look really great. We will show you how you can easily conjure up such a picture yourself with a few resources and a little creativity.
String pictures have developed into popular decoration and gift ideas. The processing of the many threads gives the pictures a completely different depth and effect than is the case with graphics or photos, for example. Of course you can buy string pictures with different motifs. But it is much nicer if the pictures are made by yourself and with a little support and practice even small children can participate. This makes the string pictures the perfect DIY project for the whole family.
What exactly is a string art picture?
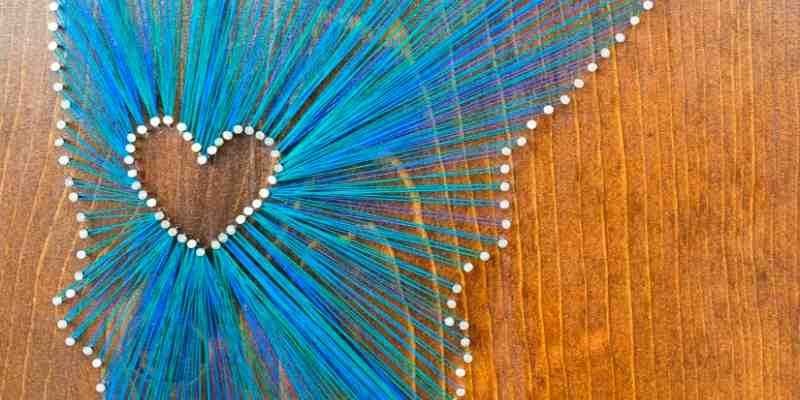
The idea of the string picture itself is not new. The pictures made of colorful threads are known worldwide as String Art. The concept is simple and fun … the motif of choice is fixed on the selected surface with the help of nails. Threads of different strengths and types are used to design the image. The string pictures can be made and bought in very different sizes. In addition to small, square motifs, large pictures in A3 format — or larger — can also be made.
What is needed for a string art picture?
One reason for the popularity of string art pictures is the rather manageable list of materials. Most materials are also available in most households, so that the pictures can be stretched in no time.
It is best to use a wooden plate as the base. This should not be too thin, because it must of course fix the nails optimally. Basically, you can also use a styrofoam plate. Here, however, it may be that the nails loosen or the tips push through the plates, which of course means a risk of injury.
Other materials that are needed are:
- short nails (the heads have to be a little wider so that the threads are secured well to them)
- a little hammer
- Thread in the desired color (yarn and embroidery thread are ideal)
- possibly template with the desired motif
Tip: If you want to change the appearance wood that you use as a substrate, lacquers and glazes are available. Most threads stand out particularly well on a light background. If you want to work with a white thread, dark varnishes are ideal. This is how they stand out from the ground.
In addition to finished string pictures, you can also get sets with all the necessary accessories in the trade to create a thread picture yourself.
Step by step to the string art picture
Even if everyone can really let off steam with the thread picture, the general work steps are always the same. Small children in particular need a little help when taking these pictures so that they do not get injured, for example, with their pointed nails and hammer.
Step 1: Prepare the wooden board
Once all the materials for the project are ready, implementation can begin. First, the wooden board is examined. Is it intact? Should it be deleted? If it feels very rough, it makes sense to sand down the wooden board. This way, the surface becomes pleasantly smooth and there is no risk of drawing in a splinter.
Then the surface of the wood can be glazed or varnished. Both are applied with a brush. A special structure is achieved when the color is applied with a sponge. In this way, light and dark shades can be processed, which trigger a certain marble effect.
Step 2: Fix the template on the wood
While the surface is drying, further steps can be started. So first a template is needed. This can be easily made in a few simple steps. Such a template can be provided on paper or cardboard. It is based on the size of the wooden plate. So that the stencil does not slip when the motif is transferred, it is always a good idea to fix it. This is possible, for example, with an adhesive tape.
Tip: If you are making a string picture yourself for the first time, you should make sure that the template is not too complicated.
Step 3: fix the nails in the wood

If the template sits at the desired location, the small nails are now fixed. The nails create the outlines of the pictures. Basically, the following rule of thumb applies: With simple motifs with rough lines, the nails can be further apart. Complex motifs with many details do not make this possible. In this case, the distances should be kept as small as possible. Especially when it comes to curves, the nails should be close together.
Step 4: Remove the template
Once all the nails are in place, you can start tensioning the threads. First the template is removed. The easiest way to do this is with a paper stencil. Small snippets can be loosened with tweezers. The thread is knotted on the first nail.
Step 5: Tension the outer line

First the outer line is stretched with the threads. Here it is up to your own taste whether you work with a different color than indoors. To tension the thread, you can always switch between inside and outside. The thread is therefore guided along the outside of the nail once and another time along the inside. But it is also possible to wrap the thread around the nails once.
So that the threads do not slip, it is possible to knot the thread from time to time on a nail. It serves as an additional fixation. This is also very practical if the thread occasionally slips out of your hand. So you don’t have to start all over again.
Step 6: Fill the interior

The next step is to start designing the interior of the motif. Here too the thread is stretched from nail to nail. In the interior, it is important that there is no orderly procedure. The threads run all over the place. This is the only way to create the typical design. Here, too, it is advisable to fix the thread from time to time so that the tension is retained.
Step 7: fix the thread
In the last step, the thread is fastened with a tight knot so that it can no longer come loose.
Tip: If you do not like the design of the string picture after tensioning, you can use acrylic varnish. This can be used to spray the threads so that their color can be adjusted. The surface is also changed again and gets great effects.
Final tip for the design of string art pictures
The choice of thread should be made carefully. It’s not just the colors that count. Stability is also important. Jute cord in particular is underestimated far too often. It looks rustic and is also stable. However, the jute cord is not suitable for complex motifs. Here you have to switch to particularly fine threads. The finished thread pictures can then be hung on the wall with a ribbon.