


Would you like to give your rooms a completely new look? Then we have just the right thing for you. Here you will find 10 ideas to make a feature wall design.
If you don’t just think about colours when designing the wall, but also enjoy trying out unusual techniques, you might be inspired by these suggestions. With a dose of creativity and a desire to experiment, nothing can go wrong with our examples. It doesn’t have to be the complete wall.
Ways to make a feature wall design
Even small areas can put on a good show, depending on how the room is used. But that doesn’t mean you have to use expensive materials for the beauty cure of the walls. On the contrary, with simple decorative material you can achieve real results. Of course, it is also a matter of taste whether one should surround one’s words with subtle tones or crack the bold colors when you make a feature wall design.
1. Linocut printing: Graphic design
Our first design (shown in the photo above) proves what a modern look can be achieved with the good old linocut printing to make a feature wall design. For black and white fans who prefer a no-frills style of living, this geometric pattern is optimal.
We have transferred the printed template with the irregularly subtracted lines horizontally and vertically to the wall. This creates an even greater depth effect!

Mark off the 30x30cm sections of the wall with masking tape. Cut the linocut plate to a square of 30 x 30 cm. Then with the cutting tool, a U-shaped hollow iron, draw the lines evenly from the linoleum. (Tools and materials are available in the art and hobby shops.)
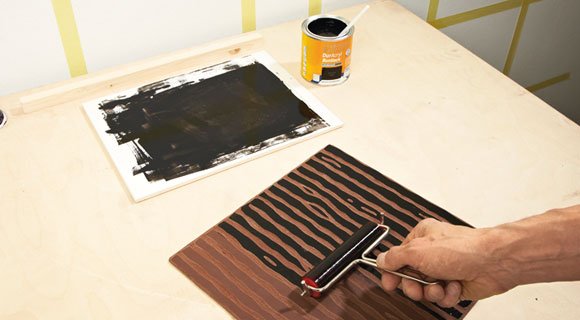
Then apply the black acrylic lacquer with the paint roller to the linocut square.
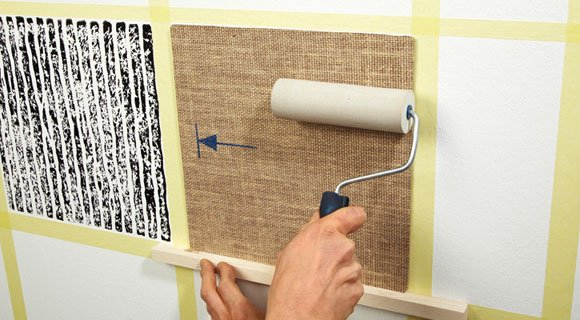
Hold the template with a stick so that it does not slip, and roll over it several times with the rubber roller to transfer the paint.
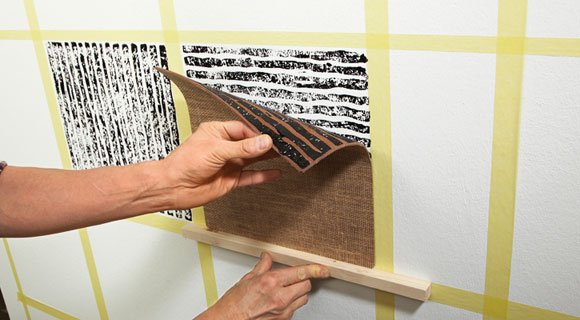
Carefully remove the printing plate. Leave pattern to dry and set.
2. Wall design made of paper: flower magic in the children’s room
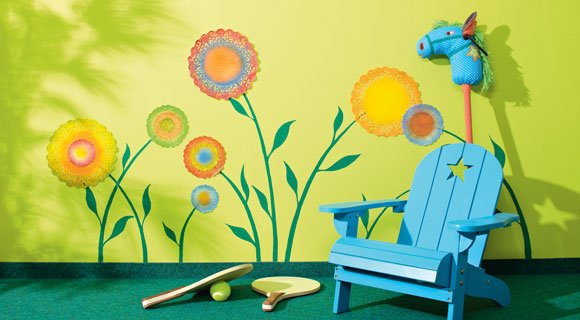
Children’s rooms can’t be colorful enough when you make a feature wall design for them. And a garden as decoration is just the thing. Implementing this idea is very simple and quick. Small cake doilies made of paper, which are available in different sizes, are particularly suitable for the flowers.
A division of labour is also appropriate here. While you paint the flower stems on the wall, the kids can decorate the doily in different colors with spray paint. Monochrome or multi-coloured – everything is allowed. Nature is a good example.

A beautiful setting for the flowers is a light green wall. With dark green wall paint, the different lengths and curved stems are applied to it by a free hand with the brush. Pre-drawing with the pencil is allowed.
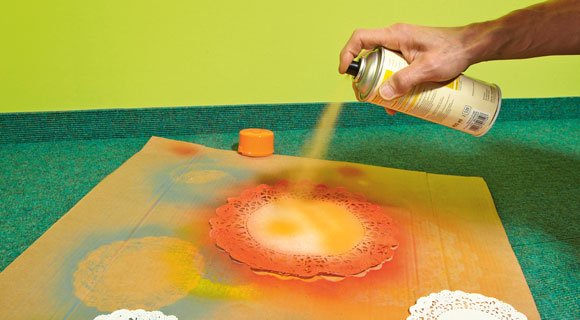
Spread the paper doilies on paper and spray them with spray paint in colours as desired

Apply permanent spray adhesive to the backs.

Glue the colourful paper flowers firmly onto the stems when the wall paint has dried.
3. Filler: Artful reliefs for the wall

Stamp printing of a different kind: Here the paint is not only pressed on the wall, but squares from a finished filler compound are first applied about 2 mm thick, and then the stamp is used. In order for the motif to come across effectively, you need a stamp of about 16 cm in diameter. The wall colour under the reliefs, which is darker by a few tones, makes the leaf ornaments shimmer easily.

Mark the arrangement of the squares (30 x 30 cm) on the wall with pencil and stick it with a painter’s marking tape.

In order to give the stamp motif more impact, we have painted the area with a darker color.

Once the paint has dried, apply the surface smoother with a curving trowel.

So that the mass does not stick too much on the stamp, immerse in rinsing water between each application.
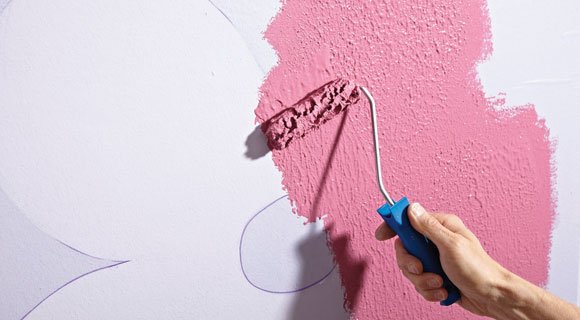
4. Rendevouz with the Swinging Sixties

Flower power is a culturally fashionable trend from the 1960s. Today, these poppy flowers in large format are experiencing their second spring and are often taken up as a stylish element by newcomers. To ensure that these eye-catchers really come to the fore, we have made them from coloured wall plaster, which is simply applied like paint with the roll. With the bright colours in azure blue and raspberry, the Sixties look is perfect.
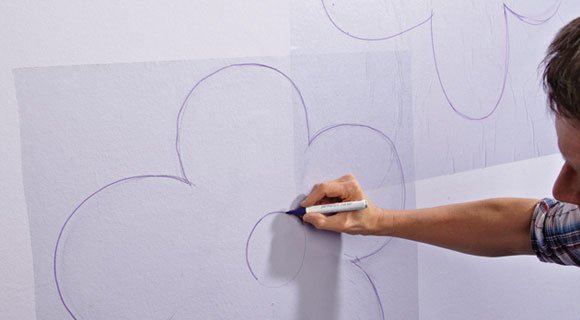
Set the area on the wall where you want the flowers to be positioned. Then glue the self-adhesive plastic and paint the contours of the flowers with a felt pen.

Cut out the flower with a cutter…carefully.
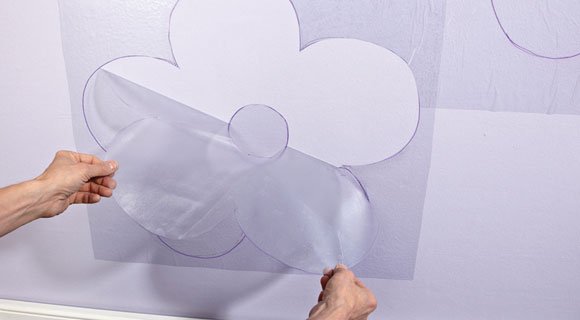
… and peel off the plastic.
Apply the paint or coloured plaster with a roller.

Before the plaster is not completely dried, the film is carefully removed.
5. Wooden panels: mural made of small wooden panels

Unconventional and far away from the usual wood panelling is this wall design with different sized plywood panels. The ornate collage has a three-dimensional effect on the turquoise-blue painted wall. This effect is supported by the rectangles glued on top of each other and the edges also spotted in the wall tone.

Paint the cut plywood rectangles with a white lacquer glaze for wood.

Once the glazing has dried, all edges are thoroughly sanded.

Then tint the the ground edges with paint. This is best done with a soft cloth. In order to get a harmonious overall picture, we have stuck to the hue of the wall.
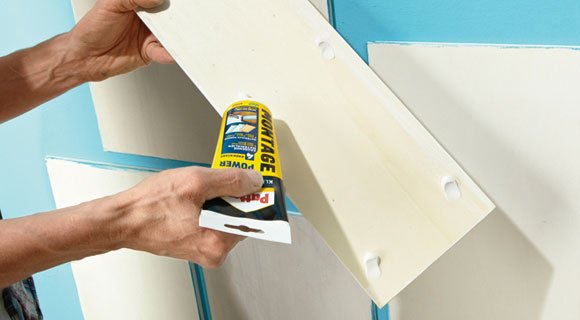
Apply mounting adhesive to the back of the plywood panels and glue the rectangles offset to the wall.
6. Romantic paint role

Among the beginnings of wall decoration include patterns of the roll. While the chalk colours of that time were rather restrained, dynamics and vibrancy can now be brought into the room with a structural roll and the variety of modern colours. The mixture in particular makes it so: On the matt wall paint, the roll pattern in silk matt emerges plastically. Tip: In order to bring the motifs to the wall without any glue, you should take over the trick with the double roll.
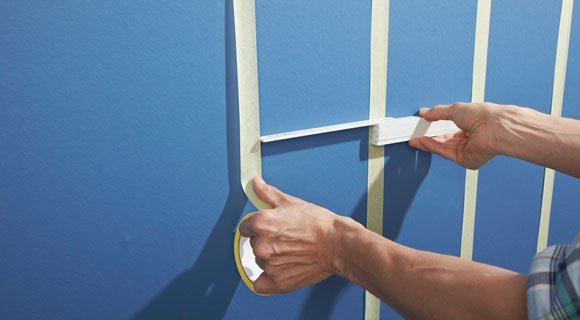
In the width of the patterned roller, mask off the walls with painter’s masking tape.

Rolls in a double pack: Dip lambskin roll in color. The paint is thus transferred to the pattern of the pattern roller evenly as you roll the pattern onto the wall.
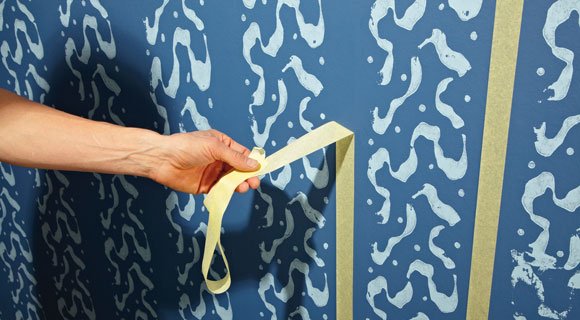
Remove the crepe from the damp wall.
7. Cake doily as a stencil

Lovers of sweet treats can pamper themselves with a decoration that is appropriate to the desire. It’s easy with pie blankets, because the top edges can be used well as a template. In pastel colours such as light blue, soft yellow, pink and red, you take a stylistic journey back in time to the 1950s – according to the motto: I love Shabby Chic. If you prefer trendy colours, paint the wall in chocolate brown and top swipe tops in the tone of milk coffee.

The cake covers (available in different sizes in drugstores) are completely sprayed with temporary spray glue

If the doily sticks firmly to the wall, the coloured lacquer is applied with a stubble brush (especially for stenciling with short, firm bristles – from the art and hobby shop).

Carefully pull the stencil off the wall while the paint is still damp.
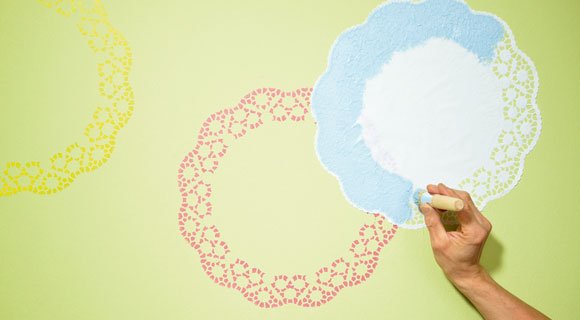
If two lace patterns are to overlap, the lower color must first be completely dried
8. Wallpapers: Brave patterns
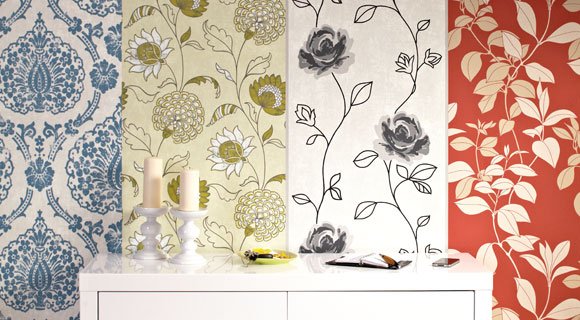
Wallpapers with floral motifs are probably not for everyone. But pattern mix, cleverly combined, is currently leading the way in the design of the rooms. The only important thing is to find the right balance. That’s why we used only floral patterns in unobtrusive colors in our example. In the hallway, this decoration becomes an eye-catcher for every visitor!

The nonwoven wallpapers are mounted with wallpaper adhesive, which is applied piece by piece directly to the wall.
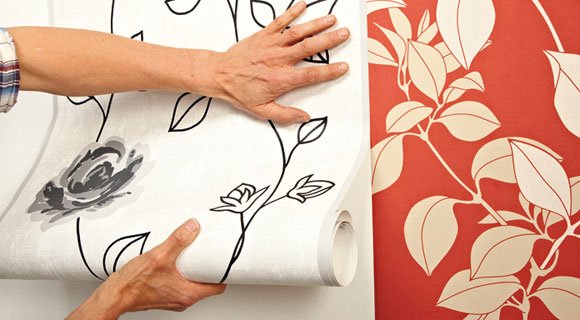
Then bring the wallpaper pieces on contact to the wall.

Use a roller to run over the pieces and bring them into better contact with the adhesive.
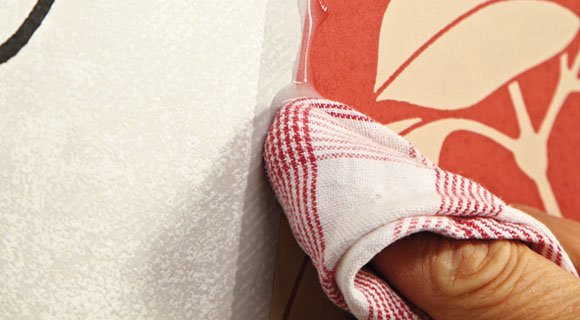
Remove any bubbles of excess paste with a dry cloth.
9. Filler compound: subtle embossing with elegant touch

In this type of decoration you can use many utensils. In addition to the foil, kitchen appliances such as meat cleavers, foam rackets and forks also shape effective structures in the filler compound. As accent bands on a white or grey wall, they can be highlighted with a coloured glaze. Self-made people with creative ambitions can prove their talent with this technique!

Mask the wall area, which is to be worked decoratively, with a painter’s marking tape. Then apply the rendering compound with a winding trowel.

Press the crumpled cover film (from the DIY store) into the damp filler.

Color accents are set here with blue color. Wipe them over the surface with a sponge.
10. Tree trunk: wooden discs exude charm

Back to nature is the motto of this unusual wall decoration. Whether graphically arranged or arbitrarily glued to a wall surface, this decoration reveals a great love of the inhabitants to native woods. The structure of the discs made of core, sapwood and bark brings life to the stall due to the different shapes and colours. An alternative for fans who can only endure nature pure: omit the clear coat.

Fix the trunk piece (approx. 20 cm) of the tree at the work table with coders and cut it into about 2 cm thick slices with the saw. Afterwards, the wooden discs are coated with a clear varnish.

After painting, sand the wooden discs. In order to achieve a smooth surface, the process of painting and sanding should be carried out three times.

Glue wooden discs with mounting adhesive to the wall.
How to use masking tape to color block walls
How to paint white walls correctly: not as simple as you think
How to paint walls correctly
 Gerhardt Richter is a writer and a trainer at trade technical colleges, specializing in carpentry, plumbing, mechanics and construction.