


The smartphone just fell into the water? You have an unsightly scratch across the screen or lots of tiny scratches that make your display look like sandblasted? The power consumption of your smartphone drives you mad? Our guide shows how to fix common smartphone problems such as water damage, a scratched screen or failing battery.
Then you should definitely read on! Today we have created the ultimate first aid guide for your smartphone. We’ll show you what you can do in the event of a case to avoid worse, eliminate small damage directly, and perhaps save your expensive toy. So look forward to our ultimate first aid guide for your smartphone.
How to fix common smartphone problems: first aid for the 3 top issues
Problem 1: Scratches on the display
We hardly use an everyday item more often than our smartphone. Every day we carry it around with us along with our keys, wallets, or whatever else fits in trouser and handbags. Over time, many small scratches accumulate on the sensitive smartphone display, which can sometimes be very disturbing. So that you can enjoy your smartphone for as long as possible despite the scrapes, we have put together a few practical tips for you on how to bring your damaged smartphone display back to a high gloss with the first way to fix common smartphone problems.

At the beginning: a word of caution
- In general, never use aggressive cleaning and abrasives or too much raw force. The risk that you will damage the display even more than you already do is simply too high here.
- Most smartphones today have a grease-repellent layer designed to protect the display from fingerprints. Unpleasant side effect: This coating does not get along too well with most cleaning or polishing agents. Therefore, always test at a small corner of the screen before you start the actual treatment on a large scale.
The miracle cure: baking powder + water
Many scratches can be removed very well with a paste of baking powder and water or with commercially available toothpaste. The baking powder does nothing but a peeling on your skin or a micropolish on the car. The smallest scratches are polished down and closed almost invisibly, making this a great resource to fix common smartphone problems.
How to remove scratches from an iPad screen
- First, combine two teaspoons of baking powder with a teaspoon of water, together to form a crumbly paste. Consistency should be similar to a commercially available toothpaste.
- Important: Glue sensitive parts on the smartphone (speaker, microphone, home button or earcup) before proceeding with tape, so that nothing is clogged or even damaged when polishing with the baking powder paste.
- Then apply a little of the paste to the smartphone display. The motto here is: Less is more!
- Polish the screen in circular motions with a microfiber cloth, cotton towel or piece of cotton wool for about 3 minutes.
- As mentioned above, be careful not to put too much pressure on the.
- Then you clean the display with a second clean cloth, which you have slightly moistened. Eyeglass cleaning cloths or microfibre cloths finally bring the screen to a high gloss.
- Repeat the operation several times if necessary.

As a “home remedy” you can also try it with commercially available toothpaste. This contains small abrasive particles, which grind off barely visible display layers during polishing. However, since more scratches could easily be “polished” in the toothpaste if particles are too coarse, you should exercise extreme caution here! Although smaller scratches on the smartphone screen can usually be easily removed with baking powder paste and toothpaste, the best results will always be achieved with a special display polish. The application is exactly the same as with the baking powder mixture or toothpaste described above.
When you need an expert
If all the above tips do not improve, the only thing left fix common smartphone problems that you can’t, is to go to the expert. Most of the time, the display is replaced directly, especially if it is a touchscreen. It contains tiny sensors on the surface that could be very easily damaged by a stronger polish than described above. However, such a repair is relatively expensive, the prices are currently around one hundred euros or even more. For this reason, the mobile phone value of course plays an important role: For a new iPhone, an HTC or Samsung top model, the expensive repair is worthwhile. However, if the smartphone is already older, the repair costs often exceed the residual value of the mobile phone.
Fix common smartphone problems 2: Battery empty in record time
Do you remember? Not so long ago, our mobile phones were still called mobile phones instead of smartphones, and the batteries lasted at least a week in standby mode. Today, the modern all-rounders have to plug at the socket at least once a day and if you leave the house a little longer, then a mobile power bank and the smartphone charger almost naturally belong in the jacket pocket.Short battery life is far from a brand or manufacturer’s problem.
On the contrary. Rather, the limited stamina of modern smartphone batteries is a fundamental problem of all current devices. It affects expensive and cheap mobile phones across all brands, manufacturers and continents. The reason: Apps, voice and data connections are quite energy-hungry for both Android and Windows and Apple smartphones and often suck your battery completely empty within a few hours.
Part 2 in our first aid guide to fix common smartphone problems is dedicated entirely to the topic of battery. With our 6 simple tricks, you can significantly increase the running time of your smartphone battery and thus also get rid of this problem.
1. Pay attention to correct standby
Before you do any optimization measures on your smartphone, check your standby mode! Here you check whether your phone is also sufficiently inactive when you put it into standy mode.
To do this, you first charge the battery completely. Then you disconnect your phone from the power and then send it into standby mode for about five minutes.
If the waiting time is over, you call the battery menu in the settings and check the values for “Use” and “Standby”. If “Use” now displays more than one minute, the device was not in standby mode correctly. In plain language: any application or setting was still active and interrupted sleep mode.
2. Remove Facebook’s rights or uninstall them immediately
The Facebook app is also a real power eater. It is therefore at least advisable to disable the live services that are constantly transmitting data. This includes, for example, the location services and background update of the application.
However, if you want to get the most out of your iPhone battery, then you should uninstall the Facebook app completely. Instead, surf the mobile web version of Facebook. This makes your smartphone’s battery last a long time.
3. Turn off push notifications
Each push notification gets your smartphone out of the standby for about five to ten seconds. So if you get 50 or even 100 notifications a day, you have already accumulated between four minutes and a quarter of an hour of use.
Therefore, you should only enable push notifications for apps that you actually expect important information from.
4. Use Wi-Fi instead of mobile phone
For some time now, operators of shops, restaurants and cafés have been able to offer free wireless internet access without fear of their customers’ surfing behaviour being driven into financial ruin.
Use this room and log in to free Wi-Fi connections whenever possible. This really conserves your smartphone battery and also reduces your data volume.
5. Track down energy swallowers
Under Settings > Battery, you can see how much energy each of your apps needs and, if necessary, put the respective programs in their limits.
The display is almost always one of the biggest power eaters – and the most of it is indulged in backlighting. The brightness can be set in the settings of the display. Often there is an automatic mode here, which usually does its thing quite well. We recommend placing a widget on the home screen that allows manual brightness control with a tap. Often, even the lowest level is sufficient in everyday use.
6. Disable background updates
Some apps regularly retrieve larger amounts of data to update, which is sometimes very much at the expense of your battery. A prominent example of this is mail or weather apps.
If you don’t want to keep this data up-to-date every 5 minutes, then it’s enough to update every few hours. At best, even when the application is started. Your battery will thank you.
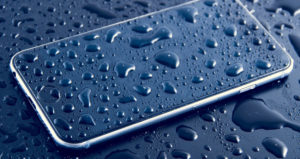
Issue 3: Water damage
The smartphone just fell into the water? The last sip of beer last night poured out on your new iPhone? Now good advice is expensive.
One thing to do is to be sent straight away: this is pretty much the worst emergency that can happen to your smartphone. Sensitive (micro) electronics and the element of life are naturally rather poorly compatible with each other. Therefore, one thing applies most of all: be quick and react immediately! With a bit of luck, you can still prevent total damage with our tips for emergency aid and at least get the device back to the point where you can save your data. We will show you in 5 steps how you have the best chances.
Step 1: Make powerless
If your smartphone is still connected to a power outlet via a charger, then the first thing you have to do is interrupt the power supply. And that’s on the fuse box! Absolutely fingers away from both the charger and the cable, as well as from the smartphone itself. There is an absolute danger to life here! This is especially true – but not exclusively – when steam or smoke leaks from the device or the smartphone is heavily deprecated in the area of the battery. In any case, the backup must always be deactivated.
Step 2: Turn off
If step 1 is complete, then the phone must be switched off as soon as possible, unless it has already switched itself off by a built-in fuse. After that, you should disconnect your smartphone from all remaining power sources. Speak to remove the battery from the device. This is the only way to effectively avoid short circuits. The relatively low voltage of a smartphone battery is also sufficient to permanently damage your device.
Step 3: Build apart
Before you can start the actual drying, the device is decomposed. Remove all attachments as far as you can as a layman without tools. But do not start with opening screws and the like. If you don’t know what you’re doing, you can do a lot more damage than you already do. Then carefully rub off all parts with a piece of kitchen paper or a lint-free microfibre cloth, thereby removing the external moisture from the parts.
Step 4: Rice as a dryer
Yes, read correctly, for the next step you need normal household rice. In addition to its status as a tasty food, rice has another characteristic. It is hydrophilic, in German: it attracts moisture. And it is precisely this characteristic that we make use of. So it’s best to pack your phone into an airtight plastic bag (e.g. a freezer bag), which you then fill with normal rice, so that the smartphone is surrounded by rice from all sides. Now your patience is required. Place the bag in a warm place and leave it there for several days so that the rice can unfold its effect.
Step 5: Basic Cleaning & Assembly
In the final step, you should undergo a detailed basic cleaning of your smartphone. The best way to do this is to use compressed air from the can, which you can obtain cheaply in any computer trade. If you don’t have such a can, then your own breathing air is enough, but make sure that you don’t pump small moisture droplets into your smartphone again.
Wipe all parts again with a dry microfibre cloth or a piece of kitchen paper and reassemble everything properly.