


Why travel when the garden is in full bloom, the strawberries are ripe and the sun is enticing? Free days or weeks at home offer the most beautiful opportunities for enjoying, celebrating, playing. What are you waiting for? You can build a four-poster garden day bed!
Thinking about full freeways, noisy hotels, or the morning fight for a lounger by the pool is most enjoyable when you’ve just made yourself comfortable in the airy four-poster garden day bed in the yard. It is an island of tranquility that can be reached at any time without exhausting arrival and only costs as much as the building material and your own working hours.
How to build a greenhouse step by step
With cushions and pillows, this four-poster garden day bed is comfortable on the spacious sunbathing area. Thanks to the backrests on two sides, a sitting area for two can become one and even three or four people can comfortably set up; but then a few side stools are useful as a storage area.
The fabric roof provides shade when it gets too hot, but it can also be easily pushed back. Since the fabric is very thin, it takes up little space at the edge. The sunscreen runs on two wire ropes, which can be easily unhooked to remove the fabric for cleaning or for the winter break.
Only the right place in the garden is missing. You can best find it by trying it out: The four-poster bed can easily be carried by two, especially if the construction is finished, but the support boards are not yet screwed on.
This four-poster bed is a wonderful weekend project for two artificially experienced people, when the squared timbers, planks and strips are cut to length and the fabric for the sun canopy is already sewn.
How to build a hammock stand
It takes the longest time to sand and brush the untreated woods: although the boards only need to be sanded on their outer surfaces and edges, to be sufficiently protected against moisture they need a coat of paint from all sides. With glaze, this is faster than with opaque paint because it absorbs and requires less drying time.
The granite slabs on which the four-poster bed stands serve the protection against humidity, but above all the safe standing. They can be easily straightened with the help of long slats and, if necessary, can be lowered into the ground.
Material:
Squares
Moldings and boards of untreated wood
Granite slabs smaller and more beautiful than concrete walkway slabs
Tools:
chop saw
Sand paper (40 and 120 grit)
clamp
Cordless screwdriver, drill
jigsaw
Sketch of the garden day bed
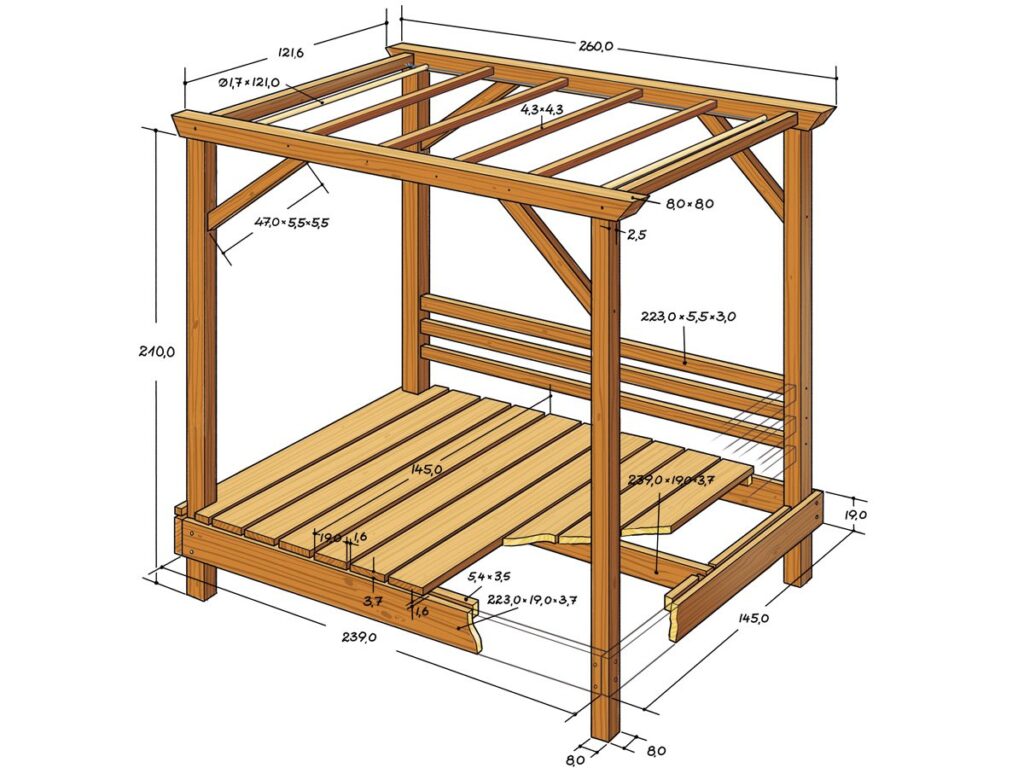
Corner posts with a frame made of planks and saddle beams and cross members form the basic framework. Headbands reinforce the corners and the lying surface gives weight and stability. The strips of the backrests are bolted through the posts.
Keep in mind that the four-poster bed is a piece of furniture that will be exposed to any weather. Since untreated wood is a sensitive material, we advise you to paint all wood parts with wood preservation glaze and dry thoroughly before final assembly.
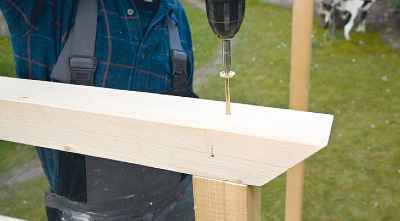
Step 1/15: Saw posts
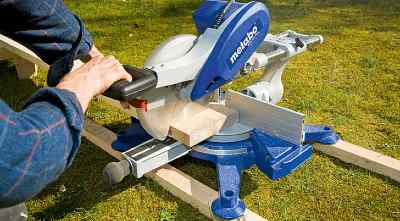
Using the crosscut saw, saw the planks and posts to the desired length.
Step 2/15: Sanding surfaces
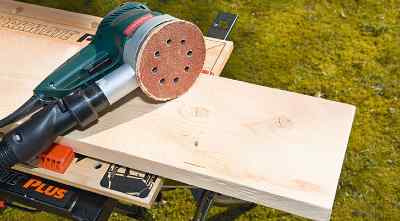
Sand the rough surfaces of the planks with the eccentric grinder. First with 40s, then with 120 grit.
Step 3/15: Attach headboard
First fix the headboard of the frame with the screw clamp on the post with a supernade of 3.7 cm (material thickness) and then fasten it with lock screws. Drill holes (10 mm) with the cordless screwdriver.
Step 4/15: Connect end faces

After both end faces are mounted, they are connected to the longitudinal boards.
Step 5/15: Offest screws

The screws on one side must sit a little deeper so that they do not meet the already twisted ones.
Step 6/15: Load Distribution
For load distribution, a long board is used in the middle; it has 1.6 cm rise upwards.
Step 7/15: Screw on roof panels
Before the pads are attached, screw on the inside of the board frame, circling roof slats with 1.6 cm supernade.
Step 8/15: Unconnect support board
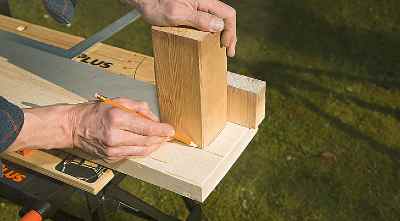
Undo the first and last support board so that it can be pushed over the post. A remnant of the post serves as a template.
Step 9/15: Saw the support board
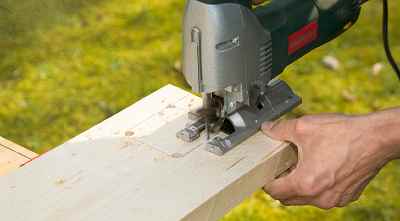
Pre-drill the corners of the cut-out, then work with the jigsaw.
Step 10/15: Adjust the support board
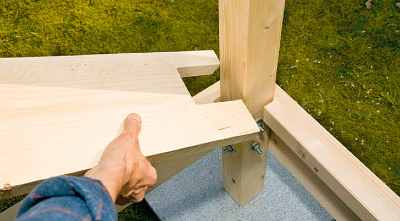
Align the sawn board.
Step 11/15: Spacers
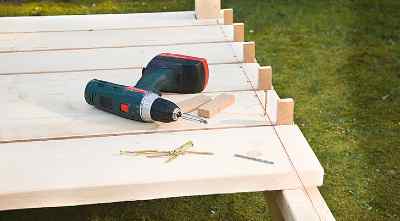
Spacers of 1.6 cm width guarantee uniform joints between the support boards. So that the screw holes lie in an escape, tighten a guide and drill the boards in front of them.
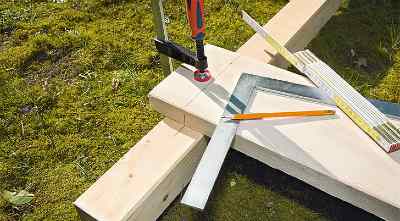
Step 12/15: Mark saddle beams
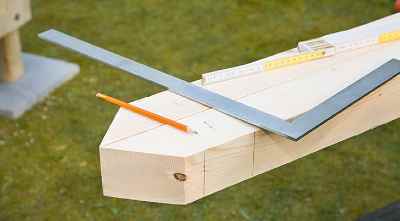
On the top of the saddle beams, the positions of the boreholes and the intermediate cross beams are marked.
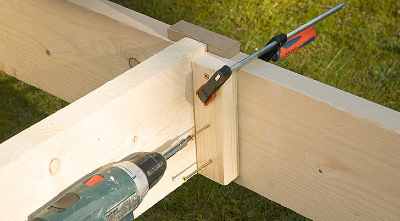
Step 13/15: Bore in the saddle beam
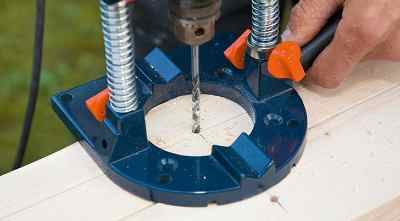
The holes must be carried out exactly vertically. A drilling vehicle helps with this. Use an extra-long wooden drill (6 mm) .
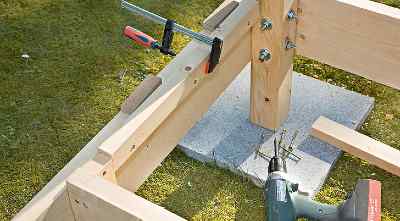
Step 14/15: Screw the saddle beams
Screw the saddle beams onto the posts and …
Step 15/15: supports for more stability
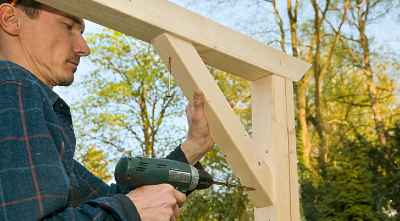
… mount the braces.
Sun canopy for the four-poster bed in the garden
A panel in bed width seams and provided at regular intervals with sewn tunnels. Push round logs with eyelets at the ends and thread them onto the wire ropes, which are fastened in screw hooks on the front and rear cross member. The ropes should be 1 to 2 cm away from the saddle beams.
 Gerhardt Richter is a writer and a trainer at trade technical colleges, specializing in carpentry, plumbing, mechanics and construction.