

The drywall is already a great thing: With a stand made of wood or metal and gypsum boards can be set in a mile long walls and that without annoying mortar mixing and long drying times before further processing. Because the metal-gypsum combination is considered a “lightweight partition wall”, any self-fabricator can put it virtually free in the room without the need for elaborate static calculations. Here’s how to plaster a wall: step by step.
Different types of plaster for walls
Plaster a wall board: what should be considered?
As easy and quick as the erection of the walls works, for the subsequent filling of the joints, careful and small-scale preparation is necessary to make the result good. From a technical point of view, the many individual plasterboard panels only become a wall through the hardened grout, which henceforth moves through the constant climatic changes as a whole.
The grout mass compensates within certain limits, the tensile and compressive forces occurring, it is usually plastic and fiber-coated. How strong the dynamics in such a wall, depends crucially on the material of the framework.
If you choose slats from the hardware store, you have to expect more movement and a higher tendency to crack. Better, and by the way not more expensive, are the metal profiles that are available for every application.
Tip : Normal sanding paper, especially if it is a cheap one, settles in seconds with the fine plaster dust of the dried grout. Grinding grates are better (also from the hardware store): They have a greater removal rate and keep them much longer. Use a 100 grid to grind.
How to use decorative plaster to style a wall
Plaster a wall: the right filler
The putty has the task of providing a perfect surface with good processability. The technical requirements for the mass for the static load capacity on the one hand and for a smooth, fine-pored surface on the other hand go so far apart that manufacturers such as Knauf have two different, but complementary putties in the program. For example, “Uniflott” is used for mixing and for the first coarse operation, “Uniflott Finish” is ready to use and serves for fine grinding.
This means that both tasks have to be fulfilled in two work steps. The drying time between these putty courses is about one hour, depending on the room climate. If in doubt, you should wait longer, so that the walls filling does not end in a drama.
Fill Drywall Walls: Instructions in two steps
If you have to fill large areas, you do not have to do the first putty too carefully. It is more important here first that all joints are completely filled. A really good surface you do not get in the first gear anyway. For the second putty with the ready-to-use “Finish” mass is better suited. For those you use a smoother, not the trowel.
Furthermore, after the first filling and the necessary drying time, the unavoidable supernatants of the filler should not be completely abraded, but should be roughly repelled with the trowel. Again, the trowel is led diagonally to the joints, to scrape any grooves in the joints.
When incorporating a Fugendeckstreifens in the fresh putty you start at the vertical joints always up and works down before. The horizontal joints start at the side where the trowel is led – left-handed man left, right-handed man right. So you better get the easy pulling movement of the trowel.
1. Fill in large areas: Here’s how it works
The short plate edges must be chamfered before screwing on the framework. Only then will the joint compound later have a sufficiently large and deep adhesion surface. Be sure to treat the chamfered edges with the plaster core with the substrate.
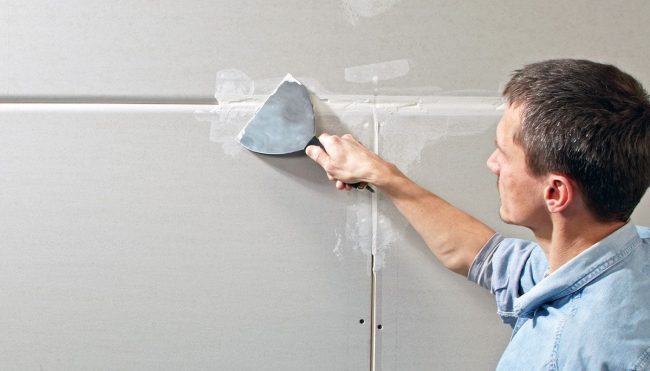
Then use the trowel or trowel to gently pull the applied grout over the joints. Hold the tool slightly diagonally so that it does not slip into the joints when you pull it off.
Here and there you will find a drywall screw that is not completely submerged. The tighten with a screwdriver. Attention: Do not completely screw the screw through the cardboard sheath!
After the drying time, sand the trowelled surface with the sanding grid. This is followed by the second putty course.
2. Fill corners and edges: That’s how it works
If the larger surfaces of the drywall are filled, the fine work follows. Especially the corners, edges and transitions of a room require a lot of attention.
With an adhesive strip (for example, “Trenn-Fix”), which is glued next to the plasterboard on the plaster of the adjacent wall, prevent direct contact of the filler with the masonry. The strip must be glued over the entire height.
With the putty is then worked up in the joint to this parting strip. After about one hour, the intermediate sanding and the second putty with the ready-to-use mass follow.
If everything is finished and filled, then you cut the looking out part of the tape with the cutter clean.
The gap of the lightweight wall to the adjacent wall can also be closed easily with an acrylic mass from the cartridge. Here, the permanently elastic mass must adhere to the gypsum board and the masonry (“two-sided adhesion”) so that it can join in the inevitable movements of the components without cracking. Attention: It should not be used silicone, because that can not be reworked afterwards with a wall paint or a plaster!
On the outer corners of the planked drywall, a thin metal corner protection strip is incorporated. Firstly, it forms a clean and straight edge and secondly prevents the brittle putty, which is brittle in the dry state, from breaking off. The bar is fixed with some staples, which are alternately placed in both thighs. The bar must be as tight as possible. With a spirit level, it is carefully checked whether it is sitting vertically. On the floor and ceiling you can jump back about 2 to 3 mm to avoid direct contact.
After the first coarse filling and the intermediate sanding, the fine-puttying comes. With a large smoother, the ready-to-use compound can be worked up to the corner protection strip and pulled out to zero in the surface. Any dried overhangs on the metal edge can be easily repelled later.
The gap between the planked wall and the screed should be left open. Again, no direct contact may arise in order to prevent a transmission of sound from the drywall to the screed and thus in the building. Ideally, even when screwing the plates 2 to 3 mm (inch rule thickness) left room. The joint is later completely covered by the floor covering and the skirting board.
 Gerhardt Richter is a writer and a trainer at trade technical colleges, specializing in carpentry, plumbing, mechanics and construction.