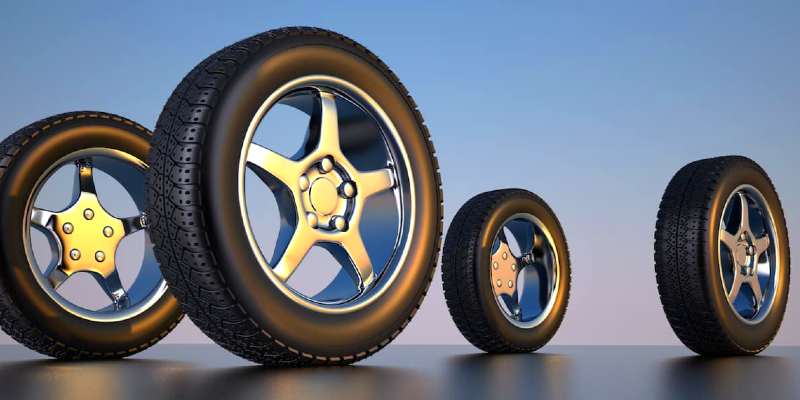
Wondering how often to rotate tires? Our guide outlines when to rotate tires and which order to rotate tires in so the vehicle is set up correctly.
Find more car guides, tip and advice
How often to rotate tires
You should rotate your tires every 5,000 to 8,000 miles. However, every manufacturer has recommended the tire change intervals in the manufacturer’s operating instructions depending on the vehicle design and purpose. If you are advised that the condition of the tires on your vehicle requires them to be rotated before the recommended interval, it would be a good idea to follow the recommendation for how often to rotate tires for that particular brand .
Since this is one of the most commonly recommended maintenance procedures, several other questions are often asked:
- Why are tires rotated?
- Why do I have to do it?
- Is it really necessary ?
You should be aware of the recommended maintenance your vehicle requires and how often it should be done. Here’s what you need to know about spinning your tires.
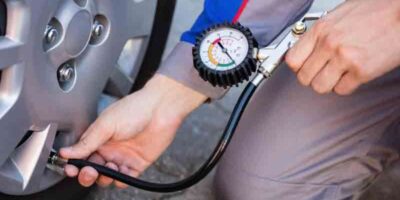
How to measure tire pressure correctly
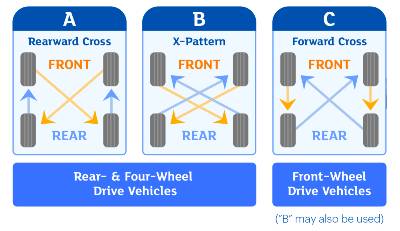
Chart for order to rotate tires
Why you should rotate tires
Your tires are a safety system on your vehicle. They keep traction with the road, which means you can drive your car in the direction you want. If your tires are not getting good traction, you can start slipping or sliding and in an accident you can land or drive off the road.
As you drive, your tires wear out. In almost all vehicles, the tires on the primary drive wheels predominantly wear. In other words, with front-wheel drive, the front tires carry more. On a rear-wheel drive car, it is the rear tires that wear out faster. In order for the tires to wear evenly over the course of their service life, the tires must be changed from front to back and vice versa.
Common misconceptions about tire rotation
There are some strong positions that people have taken on tire rotation. One such position is that tire rotations need not be performed at all. The people in this position believe that tires should be replaced and should continue to drive once the tires wear out. These newly replaced tires take a similar position and rotate them so that the non-new pair is on the drive wheels.
There are shortcomings in both positions. While proponents save a few dollars in recommended maintenance in these cases, there are some serious implications. Pairs of tires with mismatched wear can present traction problems in slippery conditions. Worn tires on the drive wheels lose traction while the others keep control. This is a major contributor to outsourcing and loss of driving control.
Advantages of rotating tires
As a recommended maintenance measure, tire rotations have real benefits:
- Balanced traction between all four wheels
- Periodic inspections can be performed while the wheels are off
- Even tread wear is less of a burden on all four-wheel drive and four-wheel drive vehicles
- Improved fuel consumption due to less wheel resistance
Have a professional mechanic, e. Rotate every 5,000 to 8,000 miles or as recommended in your owner’s manual for optimal life and safe operation. It saves you money on the life of your tires.
According to the National Highway Traffic Safety Administration (NHTSA), tire failure results in approximately 11,000 automobile accidents annually in the United States. Of those auto accidents that occur each year in the US due to tire problems, nearly half are fatal. Most Americans don’t think twice about our tires; we assume that as long as they are round, they have their feet and breath, they do their job. Rotating your tires at recommended intervals can save you a huge amount of money on new tires, but it can also save you a life.
Most automotive, OEM and aftermarket tire manufacturers agree that tires should be rotated every 5,000 to 6,000 miles (or every other oil change). Proper rotation intervals can reduce the potential for major causes of tire accidents, including tread flaking, flat tires, bare tires, and underinflated tires. However, by simply rotating and inspecting the tires, you can also diagnose suspension and steering problems and reduce fuel consumption.
What is tire rotation?
For those who may not know, tire rotation is the act of moving the position of your vehicle’s wheels and tires to a different location on the vehicle. Different vehicles are designed with different weight, steering and drive axle configurations. This means that all tires are not worn evenly on all four corners of the vehicle. Different types of vehicles have different tire rotation techniques or recommended rotation patterns.
Different types of vehicles have individual patterns that the tires should be rotated. For example, if you have a front-wheel drive vehicle, all four tires will eventually be placed at each wheel hub location within the first 20,000 miles. In this example, if we followed the original left front tire location and assumed that all the tires were brand new and the vehicle had 50,000 miles on the odometer, the rotation process would look like this:
- The left front tire would rotate left rear at 55,000 miles.
- The same tire now on the rear left would rotate across the right front at 60,000 miles
- On the right front, the same tire would turn straight back right at 65,000 miles
- Eventually, the same tire that is now on the right rear would be rotated back to its original position (the left front) at 70,000 miles.
This process continues until all tires have worn out their tire wear indicators and need to be replaced. The only exception to tire rotation is when a vehicle has two different sized tires or so called “directional” tires on their cars, trucks or SUVs. An example would be a BMW 128-I that has smaller tires on the front wheels than on the rear wheels. In addition, the tires are designed to stay on the right or left side at all times.
Proper rotation can extend the life of a tire by up to 30%, especially on front-wheel drive vehicles, as the tires on the front axle wear out much faster than the rear axle. Tire rotations can be carried out by dealers, petrol stations or tire shops such as Discount Tires, Big-O or Costco. But even a beginner can spin their tires properly, check them for wear, and check tire inflation, as long as they have the right tools and knowledge. In this article, we’re going to go over the right steps you need to take to spin your own tires and keep your vehicle running by examining them for possible problems in your car, truck, and SUV.
Understand your car tires
If you’ve recently bought a new car and want to do most of the maintenance yourself, starting with proper tire wear and inflation is a good place to start. However, older cars that used tires on them also need to be serviced and properly rotated. OEM tires are often made from a very soft rubber compound and only last about 50,000 miles (if rotated correctly every 5,000 miles they are always properly inflated and there are no problems with alignment of the suspensions. Aftermarket tires usually get Compounds made of harder rubber and can take up to 80,000 miles in perfect circumstances.
Before you start thinking about spinning your tires, it is important for you to understand what type of tire you are, what size it is, the correct air pressure, and when the tire is “worn out” and needs to be replaced.
Step 1: Determine Your Tire Size: Most of the tires made today fall under the “P” metric system for tire size. They are factory installed and engineered to improve or customize the vehicle’s suspension design for maximum efficiency.
Some tires are designed for high performance driving while others are designed for aggressive road conditions or all year round use. Regardless of the exact purpose, the first thing you need to know about your vehicle’s tires is what the numbers mean:
- The first number is the tire width (in millimeters).
- The second number is what is called the aspect ratio (which is the height of the tire from the bead to the top of the tire. This aspect ratio is a percentage of the width of the tire).
- The final designation will be the letter “R” (which stands for Radial Tire) followed by the wheel diameter size in inches.
- The final numbers to write on paper are the load index (two numbers) followed by the speed rating (one letter, usually S, T, H, V, or Z).
- If you have a sports car or sedan, it is likely that your tires will be an H, V, or Z speed rating. If your car is a commuter, you likely have an S or T tire. Trucks are different and can have an LT designation (Light Truck). However, the tire size chart still applies to them unless they are measured in inches, for example 31 x 10.5 x 15 would be a tire that is 31 inches high, 10.5 inches wide and on a wheel that is 15 inches is installed.
Step 2: Know Your Recommended Tire Inflation: This is often a trap and can be very confusing for some general auto mechanics. Some people will tell you that the tire’s inflation is found on the tire (which they would correct in an all round direction).
The tire pressure documented on the tire is a maximum inflation; This means that the tire should not be inflated beyond the recommended inflation pressure when it is cold (as the tire pressure increases when it is hot). However, this number is NOT the recommended tire pressure for the vehicle.
To find out the recommended tire pressure for your vehicle, look inside your driver’s door and find the date code sticker that shows the vehicle’s chassis number and the recommended tire pressure for your vehicle. One thing that people tend to forget is that tire manufacturers make tires for different vehicles. However, automobile manufacturers choose a tire that matches their individual components. Although the tire manufacturer recommends maximum inflation, the automaker has recommended the last word for proper handling, safety and efficiency.
Step 3: knowing how to read tire wear:
Taking time to spin your tires is useless if you don’t know how to “read” your tire wear.
Tires that exhibit excessive wear on the outer edges of the tires are typical when the tire pressure is frequently underinflated. When a tire is inflated, it tends to “drive” more than it should on the inside and outside edges. Therefore both sides are worn out.
Overfilling is the direct opposite of underinflated tires: tires that are overly inflated (based on the vehicle’s recommended tire pressure) tend to be more worn in the middle. This is because when inflated the tire grows and rolls more than evenly on the center.
Poor suspension alignment is when the front suspension components are damaged or not properly aligned. In this case it is an example of what is called “toe-in”, or the tire leaning in more than outward. If the wear is on the outside of the tire, that is “toe-out”. Either way, this is a warning sign that you should have your suspension components checked. as the CV joint or tie rods are likely to be damaged, worn, or breakable.
Cupping or uneven tire wear due to a worn bump or warped strut is a signal that there are other problems with your car and should be taken too long to be addressed.
If the tires are so subject to wear, they should not be turned. You should fix the problem and buy new tires.
How to rotate tires correctly
The actual process of rotating tires is pretty simple. First, after knowing how often to rotate tires, you next need to know what type of rotation pattern is best for your tires, vehicle, and tire wear.
Materials required
- A flat surface
- Jack
- Flat head screwdriver
- (4) Jack is standing
- chalk
- Ring nut wrench
- Air compressor tire inflation nozzle
- Air knife
- Torque wrench
Step 1: Find a Flat Surface for Your Car: Avoid placing your car on an incline, as this increases the likelihood that the car will tip over or one of the wheels will slip.
Bring your car, tools, and jack to a level surface with plenty of room for your car. Set the parking pause and make sure the vehicle is in “Park” for vehicles with automatic transmissions or in a forward gear for manual transmissions. This ensures that your wheels are “locked” so that you can easily remove wheel nuts.
Step 2: Raise the vehicle on four independent jacks: To rotate all four tires at the same time, you need to raise your vehicle on four independent jacks. Check your vehicle manual to find the right sockets for safety and grip.
- Top In a perfect world, you would do this job with a hydraulic lift with easy access to all four tires and easy lifting of the vehicle. If you have access to a hydraulic lift, please use this method above the jacks.
Step 3: mark the tire target with chalk: the pros do it – why not you? Before starting the rotation, mark the location where the tire will be rotated with chalk on the top or inside of the tire. This will reduce the confusion of balancing your tires and putting them back on the vehicle. Refer to your rotation instructions. Mark the tires with these letters for the following location:
- LF for left front
- LR for left behind
- RF for right front
- RR for right rear
Step 4: Remove the Hub or Center Cap : Some vehicles have a center or hubcap that covers and protects the wheel nuts.
If your vehicle has a center or hub cap, remove this item first before removing the wheel nuts. The best way to remove a center cap is with a flat blade screwdriver. Locate the cap removal slot and carefully pull the cap off the center hub.
Step 5: Loosen the wheel nuts: Use either a wrench or an impact wrench to remove the wheel nuts on one wheel at a time.
Step 5: Remove the Wheel from the Hub: After the wheel nuts are removed, take the wheel and tires off the hub and let them sit on the hub until all four tires are removed.
Step 6: Check the tire inflation: Before moving the tires to their new location, check the tire pressures and adjust the tire pressures to the recommended settings. You can find this information in the owner’s manual or on the side of the driver’s door.
Step 7 (OPTIONAL): Take Tires to the Tire Store to Balance: If you have access to a truck or other vehicle, it’s a good idea to have your tires professionally balanced at this point. Typically, when tires run on the back of the vehicle, they can become unbalanced if the tires / wheels hit potholes or other objects.
Rotating these tires forward will cause vibration above 55 mph and you will need to be out of balance to correct the situation. You can also take your vehicle to a store to complete this step after turning your own tires.
You can also check your tires for wear during this step. For descriptions of the common wear indicators, see the section above. If your tires are more worn than normal, it is a good idea to fit new tires and rebalance them.
Step 8: take the tires to their new destination and place them on the hub: once you’ve balanced your tires and checked the air pressure, it’s time to rotate the tires to their new location. Hopefully you have noted the location where you should spin the hoops in step 3 above. Follow these guidelines to easily spin your tires.
- Start with the left front tire and move it to its new location.
- Place the tire on the hub where it will be rotated
- Take the tire on that hub to its new location and so on
Once you’ve done this with all four tires, you are ready to reattach the wheels to their new hub.
Step 9: Install Wheel Nuts on Each Wheel: This is where most of the accidents occur. When you install the wheel nuts on each wheel, you need to make sure that the wheel is properly mounted on the wheel hub. not getting out of the NASCAR box any faster than the neighbor. In all seriousness, most wheel accidents are caused by improperly installed wheels, cross thread nuts, or improper wheel nuts.
The picture above shows the correct method and pattern of how wheel nuts should be installed based on the number of wheel nuts the vehicle has on the hub. This is called a “star pattern” and must be used when adding wheels to a vehicle. To properly install wheel nuts, do the following:
- Tighten the wheel nuts until you have turned the wheel nut at least five turns. This reduces the risk of the wheel nuts threading.
- Start with an impact wrench on the lowest setting or with the wrench by tightening the wheel nuts in the pattern recommended above. DO NOT EXCEED IT AT THIS POINT. You just want to guide the wheel nut until the wheel is flush and centered on the hub.
- Carry out this process on all wheel nuts until all wheel nuts are tight and the wheel is centered on the hub.
Step 10: Tighten the Wheel Cams to the Recommended Pressure: Again, this is an important step that many forget to finish and could result in death. Using a calibrated torque wrench, tighten the wheel nuts with the star pattern above to the recommended torque as specified in your vehicle manual. Complete this step on all four wheels before lowering. If you put the parking break and make sure your vehicle was in motion as indicated in step 1, it should be easy to do.
Step 11: Lower the vehicle from the jacks .
Test your vehicle
Once you’ve spun your tires, you’re ready for a test drive. If you’ve taken our advice in Step 7 and have your tires professionally balanced, you should have a very smooth ride. However, if you don’t, then you should look for the following signs that the tires must be balanced.
- The vehicle steering wheel vibrates when accelerating
- The front end shakes as you approach highway speeds
If this happens on your test drive, take the vehicle to a professional tire dealer and allow the front wheels and tires to be balanced. Turning the tires can extend the life of your tires by thousands of kilometers, prevent uneven tire wear and protect you from flat tires. Maintaining your tires will save you both time and money in the long run and ensure your safety on the road. Take the time to take care of your tires by turning your tires yourself or having a professional mechanic turn your tires for you.