


This upcycled lamp is a real “highlight” for real wood enthusiasts: it is made of wood leftovers and quick and easy. The perfect project for a bleak Saturday afternoon is to upcycle a lamp from leftover wood!
Find more great carpentry projects, guides, tips and advice
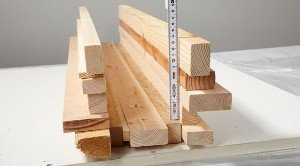
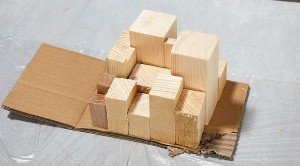
Upcycle a lamp from leftover wood: what you need
For this lamp from straps and wood residues, there is no great preparation, no special tools and the material is usually already at home. Or do not you have any residual wood storage that slowly gets dusty in the corner? Exactly these wooden strips you can use now.
In contrast to complex, large-scale projects, this lamp does not require 100% accurate work – perfect for DIY beginners or for DIY with children. Who likes to play or puzzle Tetris, has a clear advantage!
The bigger the differences in color, format and material, the more exciting the lamp will be later! If you do not have suitable strips on hand, then buy some for a few euros in the hardware store.
If you do not like the tension straps, you can replace them with simple leather straps or sails. Inside the slat bundle is an LED tube.
Tip: Do not only grab planed goods, but also saw-friendly strips are doing this project very well.
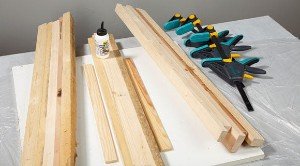
Material:
different wooden slats / wooden strips
LED light
2x tension belts red with clamping lock (for example 6 m x 25 mm)
Spax screws (3 x 16 mm)
2x eye bolts (for example 5.2 x 20 x 50 mm)
2x dowels (for example fischer duopower, 8 x 40 mm)
wood glue
Sandpaper 120 grain
Tools:
cordless drill, pencil, one-hand clamp, lighter, wood drill 10 mm, wooden board plastic-coated, cloth, saw (for example miter saw), scissors, sanding block, chisel, stone drill 10mm, folding rule
Effort: 5-6 hours
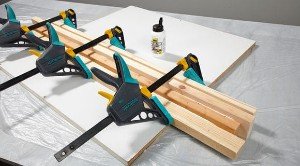
1. Upcycle a lamp from leftover wood: Cut wooden strips and glue
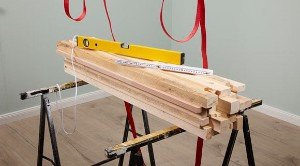
In the first step, the longer wooden slats are cut: shortened to the same length, they are joined together to side walls and lids of the lamp.Tension belt lamp: cut and glue wood
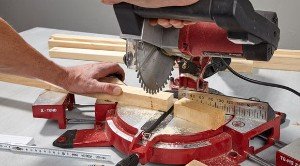
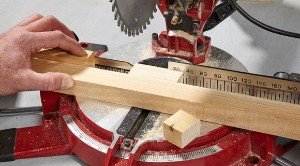
Step 1/6: Measure and saw wooden strips
First, you need to measure and saw the wooden strips. The material lengths are derived from the selected bulb plus 10 to 20 cm addition.
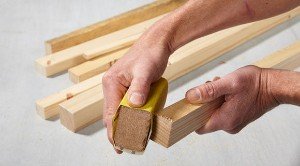
Step 2/6: Sand edges
In the next step, sand all saw edges. To do this, use a sanding block wrapped in sanding paper (120 grain).
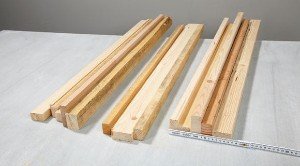
Step 3/6: Sort wooden strips
Assemble the wooden strips for the two sides and the lid. The pages should be the same.
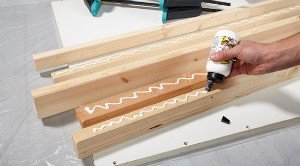
Step 4/6: Glue wood
Tip: Mark the surfaces to be glued here as well. This does not create confusion.
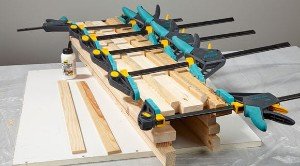
Step 5/6: Clamp wood
Clamp and wait about 20 minutes (see manufacturer’s specifications). A plastic surface as a base is ideal.
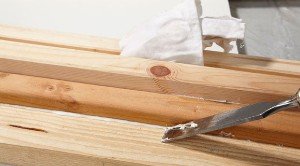
Step 6/6: Cut off glue residues
If the glue has dried slightly, the glue residues can be removed cleanly.
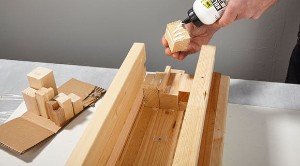
2. Upcycling lamp: assemble the individual parts
To close the lamp box on the left and right, fill the openings with pieces of wood of different lengths. The blocks protrude outwards in different lengths.Tension belt lamp: assemble individual parts
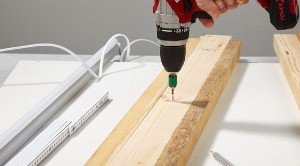
Step 1/10: Screw on the lamp holder
Screw the lamp holder on the inside of the lid (3 x 16 mm) and drill the cable outlet (10 mm).
Step 2/10: Glue sides and lids
Glue the sides and lid together. Supplements under the sides create an offset to the lid.
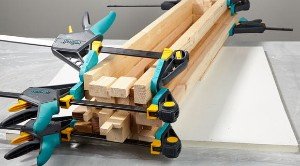
Step 3/10: clamp glue connections
Here, too, clamp the glue connections firmly and give sufficient time to tie.
Step 4/10: Measure pieces
Now the pieces must be closed. To do this, determine the degree of opening.
Step 5/10: Cut short wood sections
An auxiliary construction made of a board helps to saw the short pieces.
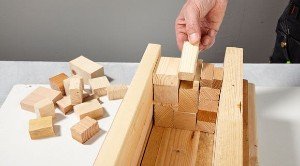
Step 6/10: Assemble
Now construct the pages according to the “Tetris principle” from different sized wooden sections.
Step 7/10: Place side panels on cardboard
Place the assembled but not yet glued pages on a cardboard pad – so the individual wooden sections can be easily “reconstructed”.
Step 8/10: Glue wooden blocks
Then thoroughly glue the individual wooden blocks together. Here, too, it helps to have the areas to be glued marked.
Step 9/10: Clamp ends
Fix the ends with enough force. Again, you should allow enough time for the glue.
Step 10/10: bulbs
Now you can insert the bulb into the holder and plug the cable through the passage.
3. Upcycling lamp: Final assembly
Choose a plug that matches the material of your ceiling. The duopower of fischer, for example, holds well in brick, pores concrete or concrete ceilings.
Create the hole at least 10 mm longer than the dowel. The diameters of the borehole and plugs should be the same.
In the case of soft material, the borehole must be 1 mm narrower. Screws select one to two numbers smaller than the plug: 8-seater plug with 4.5-6 mm screws.Tension belt lamp: final assembly
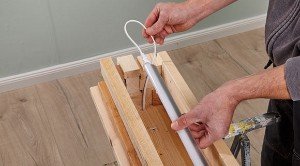
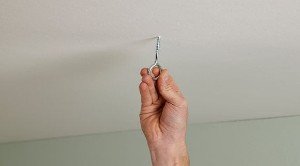
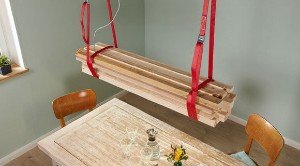
Step 1/6: Mount lamp suspension
Drill holes for lamp suspension. Pay attention to the course of the flush-mounted cable. Ring screw.
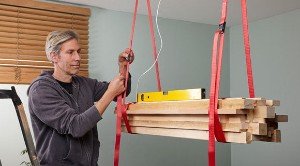
Step 2/6: Thread straps
Pull the tension belts through the ring screws and adjust the approximate height of the lamp.
Step 3/6: Align the lamp horizontally
Hang the lamp in the tension belts and align the wooden construction horizontally.
Step 4/6: Shorten ends
When the length of the tension belts is adjusted, you can shorten both tension belts with scissors.
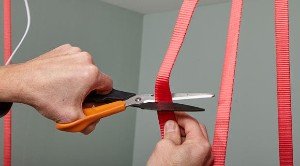
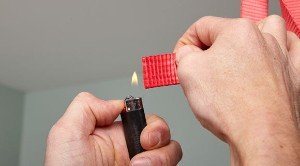
Step 5/6: Seal ends
To prevent the ends of the nylon straps from fraying, you can sing them with a lighter and seal them.
Step 6/6: Done!
If you connect the lamp itself to the power line, you must first remove the fuse!
 Gerhardt Richter is a writer and a trainer at trade technical colleges, specializing in carpentry, plumbing, mechanics and construction.