

When many people celebrate together, it quickly happens that you lose track of who owns which glass. This doesn’t happen with glass markers. Our guide will show you how to make DIY glass markers.
Find more upcycling and sustainable DIY ideas for the home.
No matter whether on birthdays, Christmas or New Year’s Eve – everyone likes to drink a lot. It happens more often that guests swap their glasses and have to get a new drink. With a glass marker, this problem is quickly resolved. In the following we present step by step 5 practical glass markers, which can be easily and quickly made yourself:
» Glass markers made of shrink film
» Clothespins as glass markers
»Glass markers made of window paint
»Glass markers made of bottle caps
»Glass markers made of polymer clay
5 methods to make DIY glass markers
Glass markers made of shrink film
Shrink film markers can also be prepared well with children as they are a very easy way to make DIY glass markers. They also go well with a New Year’s Eve party where motifs such as lucky pigs, shamrocks or fireworks are suitable.
Required material:
- Transparent shrink film
- Perforator
- permanent markers
- scissors
- possibly sheet with template
- baking paper
- oven
- line
That’s how it’s done:
❶ Place shrink wrap on a smooth surface, possibly a sheet with a printed / pre-drawn template.
❷ Use permanent markers on the blunt side of the film to transfer a motif of your choice (heart, shamrock, motifs to match the occasion). It should be noted that the motif will later become significantly smaller, so it should be painted generously.
❸ Names can then be written on the motif, but they must be written upside down
❹ Cut out the motif and punch the hole in a suitable place.
❺ Place the motif with the rough side up on a baking sheet covered with baking paper.
❻ Put in the preheated oven at 160 ° C and bake for 1-3 minutes. The film contracts and spreads out again. After spreading, bake for about half a minute and take out of the oven – let cool.
❼ Thread a short piece of cord through the hole.
❽ Then put the cord around the stem of a wine or champagne glass and tie a knot. Make sure that the name does not point upside down.
Tip: This glass marker is suitable for glasses with a stem.
Clothespin as a glass marker
This type of glass marker is sustainable as a way to make DIY glass markers because it can be used again and again. This saves time and resources.
Required material:
- Wooden clothes pegs
- chalkboard paint
- brush
- newsprint
- chalk
That’s how it’s done:
❶ Paint the clothespins on one side with the brush with the blackboard paint and let them dry completely on the newspaper.
❷ Turn the clothes peg over and paint the 2nd side and edges completely, let them dry well.
❸ Once the paint has dried, the clothespin can be labeled with chalk.
Tip: This glass marker is suitable for all types of glasses.
Window paint glass markers
This way of marking a glass goes well with children’s birthdays, because children can help with the preparation and the colorful motifs can be adapted to the theme of the celebration.
Required material:
- Window color
- Transparent film (e.g. brochure cover)
- Paper & pen
That’s how it’s done
❶ Draw several small templates (animals, names, figures, etc.) on a piece of paper
❷ Place the sheet under the film (or put it in the sleeve)
❸ First draw the borders with Window Color and then paint or outline the motifs.
❹ Let the motifs on the film dry completely, preferably overnight.
❺ The motifs can then be peeled off and glued to any glass.
Tip: This glass marker is suitable for all types of glass.
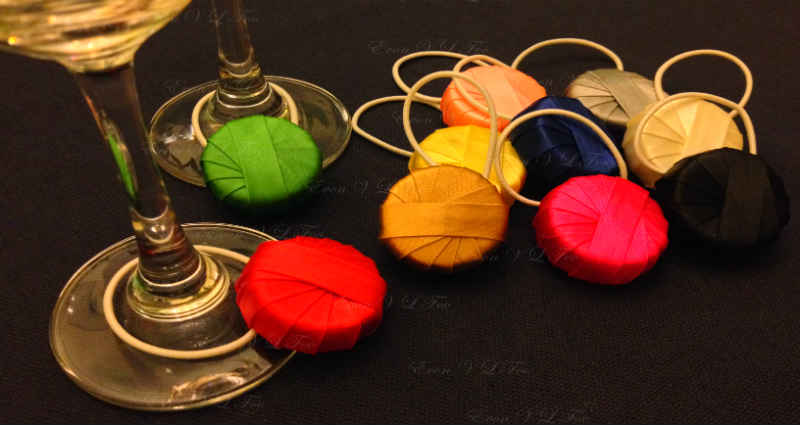
Bottle cap glass markers
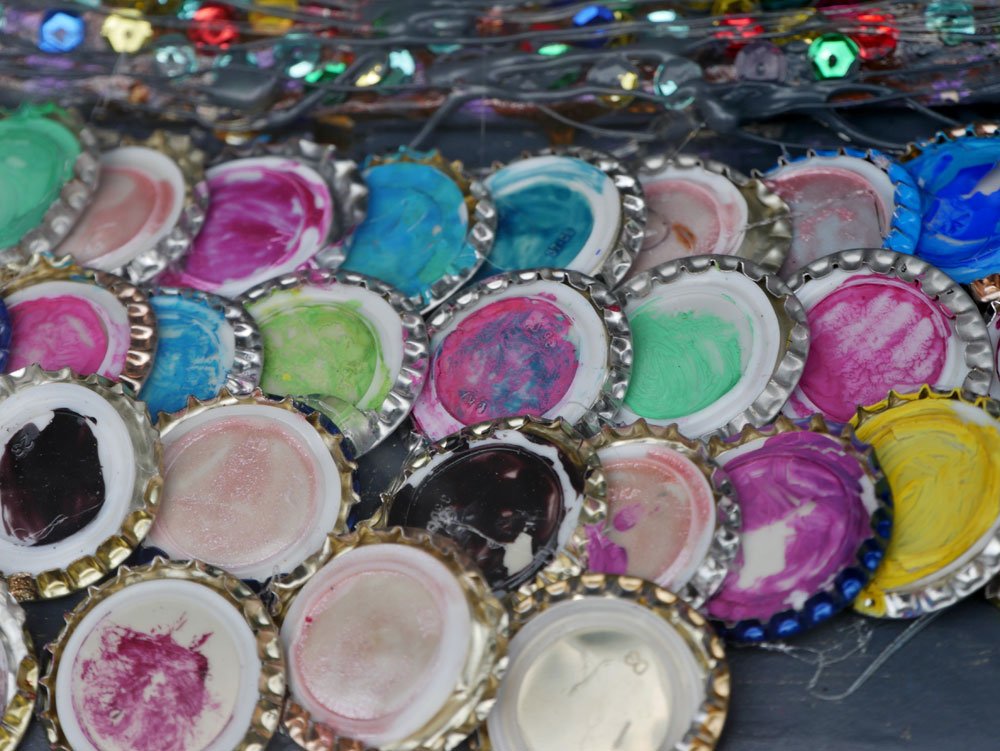
Bottle cap glass markers are a great opportunity to recycle the remaining bottle caps and create an environmentally friendly solution for guests. You can wrap the bottle caps and then attach them to rings (as shown in our main image) or paint them using the method below — great for children to help with!
Required material:
- several bottle caps
- newsprint
- Brush fine & thick
- white & colorful acrylic paint
- gimlet
- Wine Glass Ring Hoops
That’s how it’s done:
❶ Line the underlay with newspaper and spread the bottle caps on it
❷ First prime the bottle caps with a wide brush and let them dry.
❸ After drying, paint each bottle cap in a different color. Filigree patterns or animals such as ladybirds or bees can also be painted, which requires a fine brush. Names look just as good on the bottle cap – they can be written down with a fine brush or permanent marker.
❹ Let all bottle caps dry again.
❺ Then use a hand drill to drill a fine hole on the edge of the surface of each bottle cap.
❻ Thread the crown caps onto the wine glass ring hoop earrings.
❼ Place hoops around the stem of a glass and close them.
Tip: This glass marker is suitable for glasses with a stem.
Fimo glass marker
Fimo glass markers are a little more difficult to manufacture, but can be used again and again and look particularly impressive. For example, they are a nice gift idea for Christmas.
Required material:
- different polymer clay colors
- clean surface (glass plate, baking paper)
- possibly knife
- oven
- baking sheet lined with baking paper
- Metal knife & wooden stick
That’s how it’s done:
❶ Prepare a very clean, dust-free surface, clean your hands thoroughly.
❷ Take the required Fimo color pieces out of the packaging and knead softly.
❸ Now knead the desired motif. There are hardly any limits to creativity here. It is only important that the figure has a holder for the glass (the tail of an animal, an angled arm, candy cane etc.)
❹Individual parts can be cut with a knife if they are to be particularly precise.
❺ Assemble the individual parts to a complete work by carefully pressing them together with a little pressure. The transitions between the assembled parts can be spread with a wooden stick so that they are smoother and hold better.
❻ Carefully loop the part of the polymer clay motif (e.g. the tail) that will later hang on the glass around the handle of a thin metal knife.
❼ Preheat the oven to 110 ° C top / bottom heat. Harden the polymer clay product together with the knife on a baking sheet lined with baking paper for approx. 20-30 minutes. The product must not burn, which is why the hardening process should always be checked.
❽ Take the polymer clay motif out of the oven immediately and let it cool down.
Tip: This glass marker is suitable for all glasses.