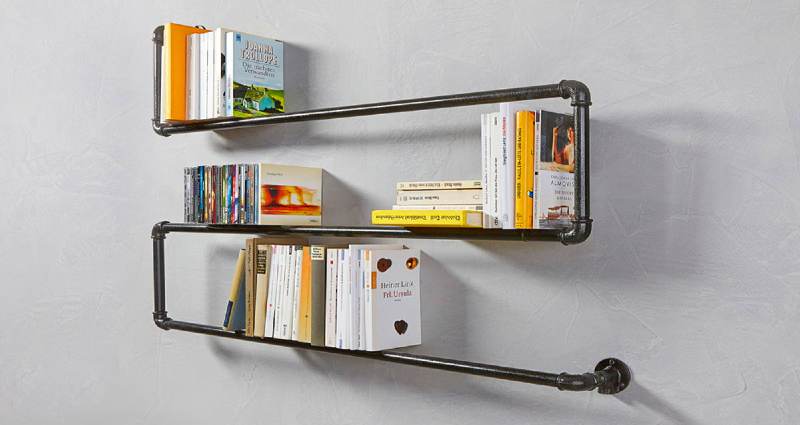


Is there an easy upcycling way to make a shelf from pipes? Upcycling means that new and old products are created from old and avoidable waste or waste. For example, you can make a shelf from pipes to produce a unique wall feature. We’ll show you how to do it, step by step.
Find more carpentry guides, tips and advice
The shelf made of pipes is easy to make yourself. The costs are limited: they total around 100 euros. If you still have a few old threaded pipes in the storage room, you can also build the shelf for less than 100 euros. Otherwise, buy the parts cheap in a hardware store or hardware store.
There are numerous different variants for the tube shelf. You can choose which one you like best. It starts with the tube thickness: from very thin (1/8 inch) to medium thickness, as in our example with 1/2 inch to massive diameters of one inch or more, everything is possible. You can also decide whether to leave the pipes in their original galvanized condition for the trendy industrial look or to design them as a colored highlight on the white wall.
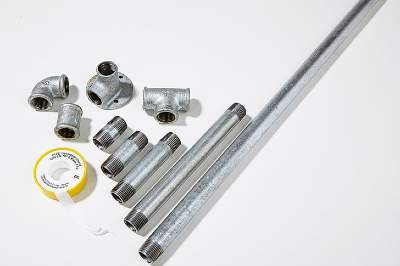
Build a shelf from pipes yourself: that’s what you need
Material:
- 2 x threaded flange
- 2 pipe double nipples
- 6 threaded pipes
- 6 x 90 ° fitting
- Teflon tape
- 6 screws
- 6 dowels
- Sandpaper
- acetone
- Rag
- Spray primer (here: Ultra spray primer from Ultra-Color)
- Spray paint (here: iron mica graphite 400 from Duplicolor
Tools: pipe wrench, spirit level, hammer, cordless screwdriver, folding rule
How to upcycle suitcases into furniture
Building a pipe shelf: the preparation
Roughen pipes, remove traces of grease, wrap thread with Teflon tape, screw on rack structure and apply primer – it’s that easy:
Step 1: The pipes must first be carefully roughened with sandpaper so that the paint adheres well later.

Step 2: Remove any traces of grease with acetone. This is the only way to obtain an optimal surface.

Step 3: Use Teflon tape to wrap the threads against the screwing direction in several layers. This strengthens the screw connection.

Step 4: Now screw the pipes and fittings together. Always pay attention to a 90 ° angle.

Step 5: A threaded flange is used as the wall bracket. A pipe double nipple is used for screwing to the first fitting.

Step 6: The first coat of paint forms a primer coat, which you spray on evenly after carefully shaking.

Don’t forget: Measure the height of the books you want to put on the shelf before you set the length of the vertical tubes. Then everything fits later.
Make a shelf from pipes: painting and assembling
Effect paint makes the pipe shelf shine and attaching to the wall is also very easy: threaded flange, dowels and screws – you do not need more.
How to upcycle a ladder into a shelf
Step 1: After drying, apply the top coat in the desired color. It is advisable to work in several thin layers.

Step 2: To attach the shelf to the wall, align it with a spirit level and mark the drill holes on the wall.

Step 3: Dowels ensure a secure hold. Attention: Choose the right dowel for the respective surface.

Step 4: Make sure that the screws are tight and that the surface of the threaded flange lies flat. Then nothing wobbles later.

Step 5: Finally, cut a template out of cardboard. So you can still paint the screw heads without getting dirty. Your own shelf made of pipes is ready!

 Gerhardt Richter is a writer and a trainer at trade technical colleges, specializing in carpentry, plumbing, mechanics and construction.