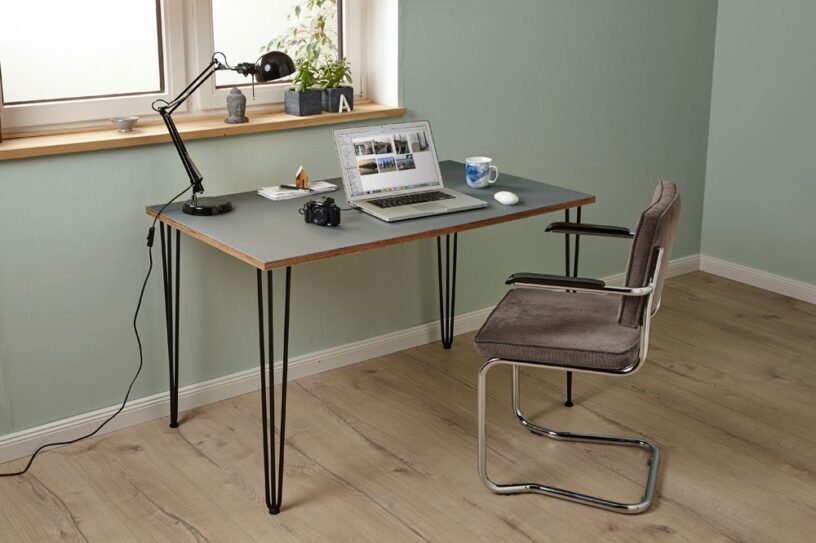


For a modern desk with exclusive linoleum flooring we will show you how to glue and work the material properly. It’s easier than it looks to cover a desk with linoleum!
Linoleum is known most as a classic flooring. The material can also be used for other smooth surfaces. So what about an elegant desk with a linoleum finish?
Cover a desk with linoleum: These are the advantages
A coating of linoleum has many advantages at our table: The material feels very pleasant on the skin – warm and soft. Linoleum is relatively resistant, pressure points, for example, almost completely disappear after some time.
Also visually, the coating is very appealing with its matte finish, it is available in many different colors. Thanks to the special properties of the material, there are no fingerprints on linoleum and because linoleum is antistatic, it does not attract dust either.
How to build a gaming desk
Linoleum: What is it?
Linoleum is almost entirely made from renewable raw materials: the main ingredient is linseed oil, which is oxidized in a special process, thereby maintaining its strength. The linseed oil mass cork flour and natural resins are mixed. Finally, the mass is pressed onto linen or paper webs.
Prepare linoleum properly
Before working on linoleum, all materials (linoleum, glue, and support plate) should be allowed to acclimatize for 24 hours at room temperature. Stress problems did not arise with the multiplex carrier plate used by us, since this consists of many different layers.
If you stick the furniture linoleum on a relatively thin carrier material such as chipboard or solid wood, then tensions between the two materials can arise. This can be avoided by gluing the carrier plate on both sides: The so-called counter-pull can consist of inexpensive veneer, foil or impregnated paper.
That’s what you need for the linoleum desk
Birch multiplex panel (size as desired, here: 1,250 x 800 x 21 mm)
Linoleum, thickness 2 mm
Contact adhesive )
Hairpin Table Legs 71 cm
Half round head screws 5 x 16 mm
Sandpaper 120 & 240 grit
Hard wax oil
Linoleum cleaning and care products
Tools: pressure roller, leveling cutter 12,7mm, cutter, bevel cutter 45 °, guide rail, circular saw, rag, router, sanding block, orbital sander, steel ruler, Styrofoam plate, angle driver, serrated teeth: A3, 180 mm, folding rule
Adhesive: Whether contact, dispersion adhesive or natural rubber – various adhesives are suitable for linoleum, provided they are approved for it. Contact adhesive has the disadvantage that it is highly solvent-containing. In contrast, dispersion adhesives consist largely of water.
Also, the processing varies depending on the adhesive type: dispersion adhesive is applied on one side, then the coating immediately on it. Contact adhesive on the other hand you wear on both sides. You can glue this adhesive after a drying time.
Important: If you do not let the adhesive air sufficiently, air bubbles may form under the covering.
1. Prepare the table top and topping
When cutting the linoleum covering, make sure to add around two centimetres of material. This makes it easier to glue later – excesses are subsequently removed.
Step 1/8: Crop multiplex plate
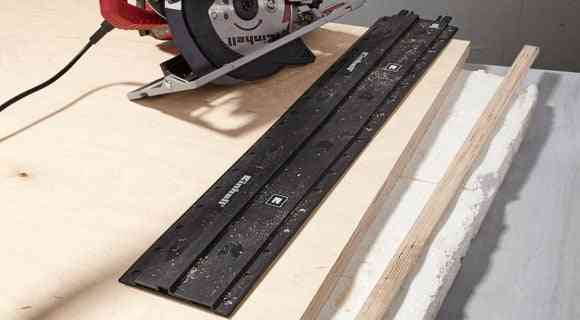
Saw the multiplex to the desired size (here about 123 x 70 cm). The styrofoam plate facilitates the hemming.
Step 2/8: Sanding edges
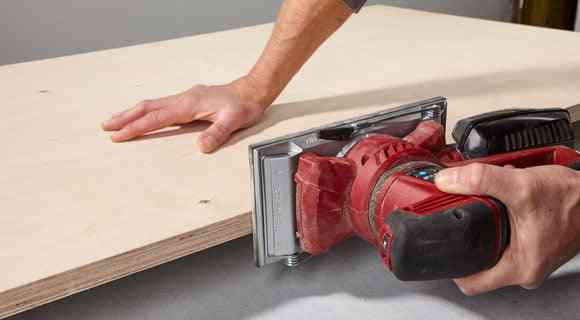
Sand the surface and edge thoroughly (120 grain). Unevenness on the edge should no longer exist.
Step 3/8: Cut linoleum
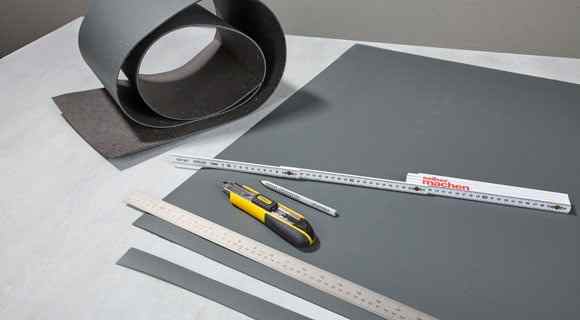
Cut the linoleum now. Do not forget the addition of material of approximately 2 cm.
Step 4/8: Apply contact glue
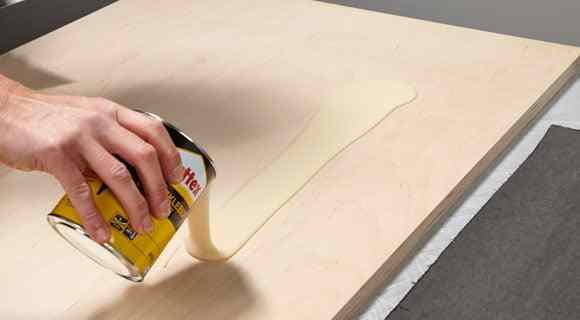
Apply contact adhesive to the dust-free multiplex plate. Observe the manufacturer’s instructions and only work in well-ventilated rooms or outdoors.
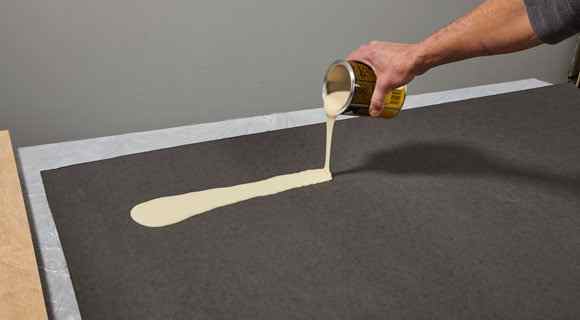
Step 5/8: Distribute glue
Distribute the adhesive over the surface, paying attention to a uniform adhesive application up to the edges. A thin layer of adhesive is sufficient.
Step 6/8: Add glue to linoleum
In the next step, a thin layer of contact adhesive is applied to the underside of the linoleum.
Step 7/8: Distribute adhesive
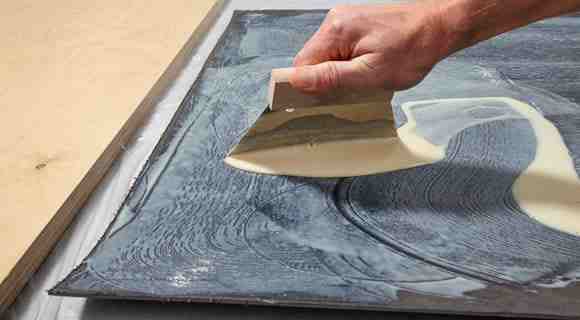
Spread the glue over the surface with the spatula. Again, distribute the glue evenly up to the edges.
Step 8/8: Let the glue go tacky
Allow the adhesive surfaces to ventilate for 10-15 minutes. If it feels dry, you can process it further.
2. Building a desk: Apply linoleum topping on table top
Now it gets tricky: As soon as the two adhesive surfaces lie on top of each other, they can no longer be separated or moved. Therefore, let us help you with this step.Linoleum desk: Apply table top
Step 1/5: Put linoleum on plate
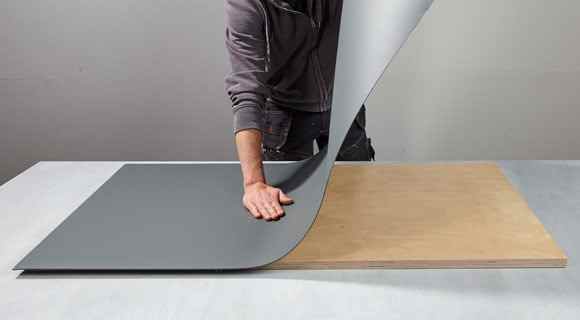
Place the linoleum on the plate from one side. Pay attention to the material supernadening as much as possible.
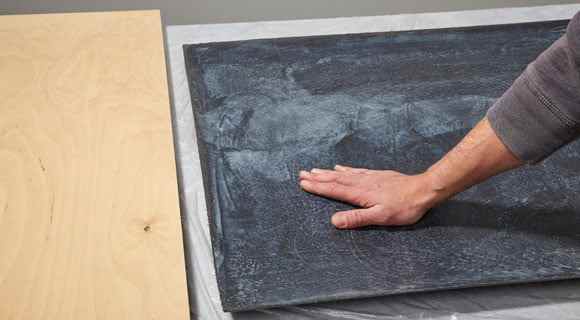
Step 2/5: Lay linoleum without air pockets
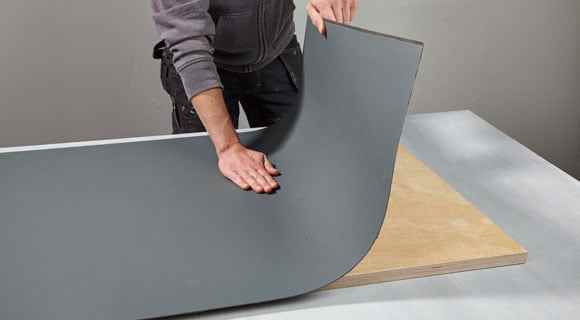
Swipe the linoleum slowly and evenly on the plate. No air pockets must be created.
Step 3/5: Roll out from the center
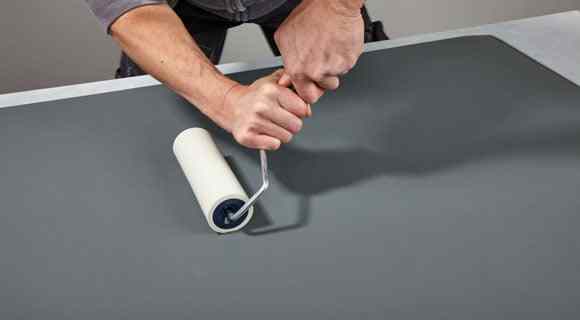
Now roll the material from the center to the edges. High pressure ensures the durability of the bonding.
Step 4/5: Rolling edges
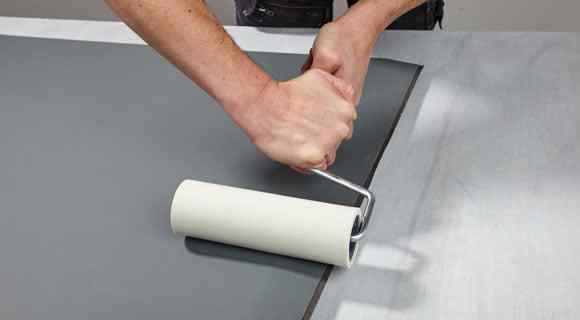
Finally, use the pressure roller to drive off the edges at high pressure.
Step 5/5: Stable substructure
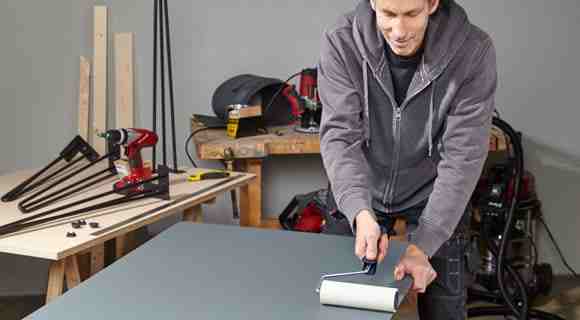
Place the plate on a stable substructure. This allows you to apply the necessary pressure to the plate.
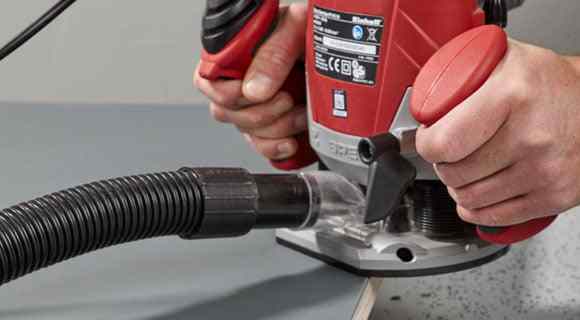
3. Working linoleum with top cutter
In the next steps, we use the top cutter to mill and grip the linoleum edge flush. If you do not have an upper cutter at hand, you can also shorten the linoleum with a hand-held circular saw with guide rail.
Use a flush cutter for the top cutter. The start ring is guided along the edge surface of the support plate. Meanwhile, the cutting edges remove the overcoming material.Linoleum desk: Work with top cutter
Step 1/10: Cutting out the linoleum that survives
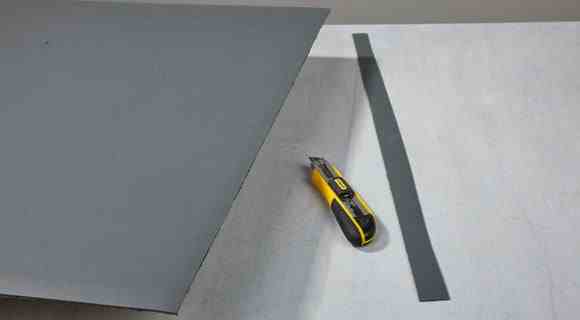
Remove excess edge linoleum with a sharp cutter. Use a ruler or a smooth wooden strip to help , so do not cut into remaining material.
Step 2/10: High speed on the router
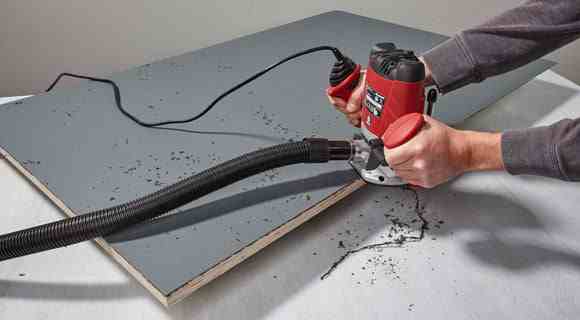
With the router, it is now time to mill the edge flush and free it from excess linoleum. Set a relatively high speed for this soft material.
Step 3/10: Tip: Secure sliding surface
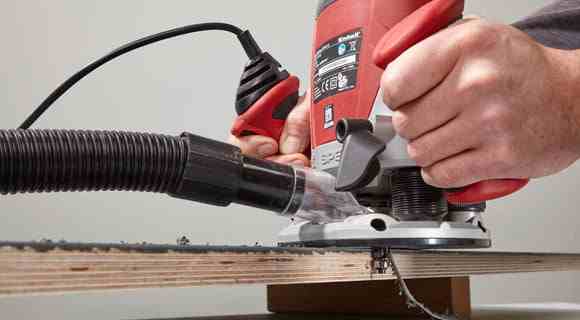
Tip: Avoid scratches on the linoleum surface by securing the sliding surface of your top cutter or the edge of the table.
Step 4/10: ragged edge
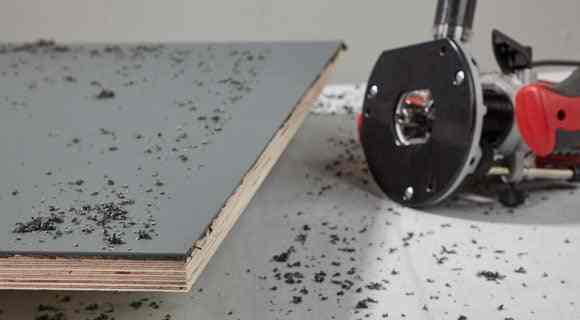
Despite high speed, the linoleum edge remains frayed. It doesn’t matter, because…
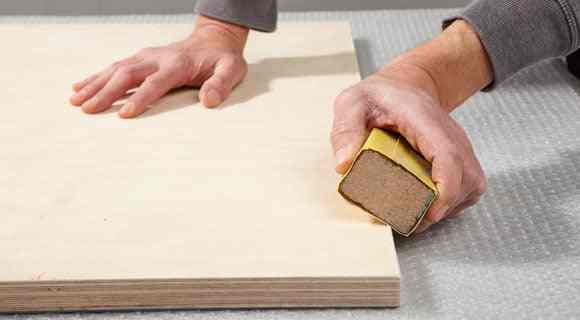
Step 5/10: Belt sander
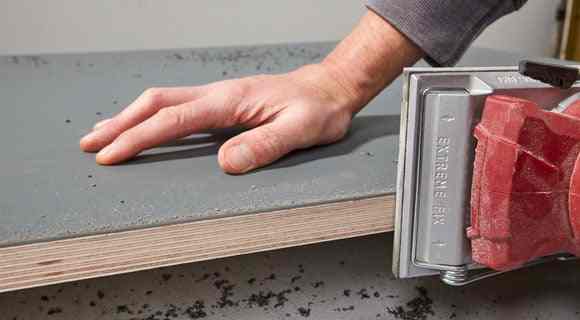
… in the next step, sand the edge cleanly with a 120 grain. Whether you are using a grinder or …
Step 6/10: Sanding block

… using a sanding block, which you wrap with sandpaper, is left to you. The main thing: be careful!
Step 7/10: Clean Edge
A clean edge is important. Unevenness would otherwise be transferred from the start-up ring of the cutter to the chamfer.
Step 8/10: router heads in comparison
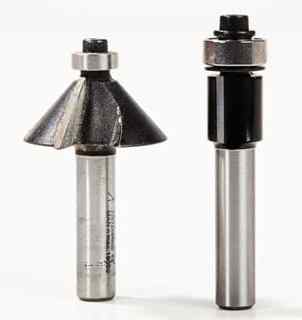
With the flush cutter (right), the start ring is guided along the edge surface of the support plate. With the chamfer cutter (left) you can easily chamfer edges. Here, too, a start-up ring is running.
Step 9/10: edges
The next step is to finish the edge. Optionally, you can also do the edge with sandpaper.
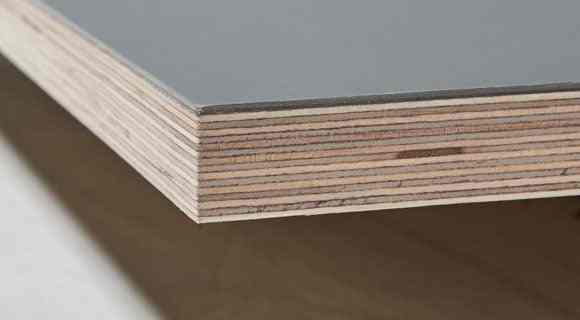
Step 10/10: Finished Edge
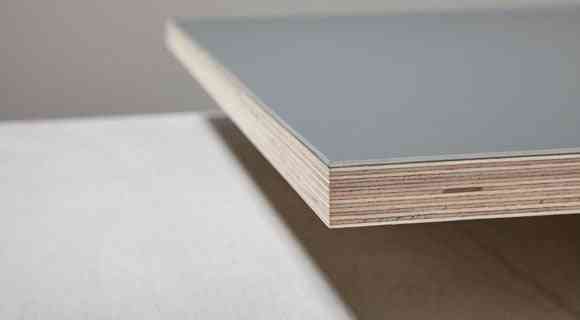
Since the fasted edge offers little attack surface, the surface is now difficult to release from the plate.Next
4. Building a desk: Last steps
To ensure that the linoleum is not scratched, place as soft a material as possible in all work steps, such as a bubble wrap or foam rubber. As table legs we use hairpin legs, which are available in different lengths.
Step 1/5: Break lower edge
Now hone the bottom edge of the multiplex plate with a 120-grain sanding paper.
Step 2/5: Screw table legs
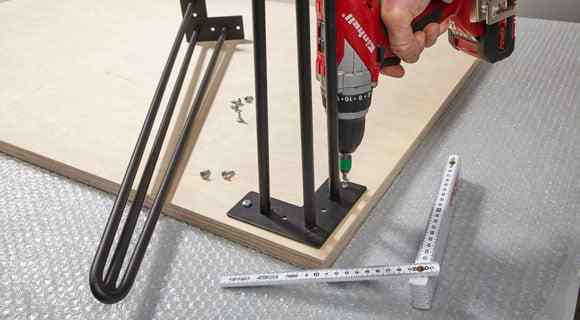
Measure the position of the table legs and screw it with 5 x 16 mm half-round head screws.
Step 3/5: Angular screwdriver attachment
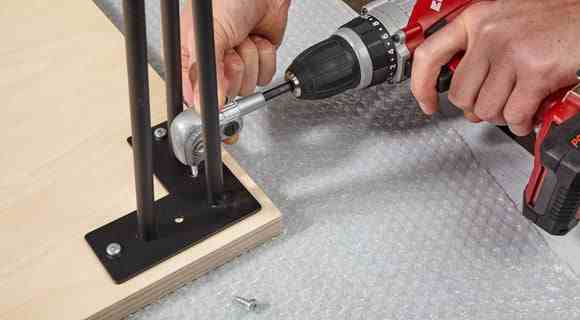
Tip: Use an angle screwdriver attachment for hard-to-reach fittings.
Step 4/5: Oil edges

Oil the edge twice: After the first pass, let the oil dry and then sand with 240 grain.
Step 5/5: done!
The finished desk is elegant and allows you to work in a pleasant way.
Tips for cleaning and care
Remove adhesive with a soft cloth and water. If the adhesive has already dried, it can be replaced with turpentine substitute.
 Gerhardt Richter is a writer and a trainer at trade technical colleges, specializing in carpentry, plumbing, mechanics and construction.