
Outlines how to test a capacitor with and without capacitance function on a multimeter, how to test the capacitor with a continuity tester or using an ohm meter, and the ‘rough test’ by short-circuiting it.
Find more car and motorbike guides, tips and advice
CONTENTS
What is a capacitor
Visual inspection
Functional test
1. How to test a capacitor without capacitance measurement
2. How to a test a capacitor with a multimeter continuity tester
3. Using a multimeter with capacitance measurement
4. How to test a capacitor using an ohmmeter
5. How to test a capacitor by short-circuiting it
The multimeter is the measuring device of choice when it comes to testing a possibly defective capacitor. There are several ways to check a capacitor using a multimeter.
Basically, however:
The multimeter requires a special measuring device in order to be able to test capacitors and thus to determine the exact values of the capacitance of a capacitor. If there is no function for measuring capacitance, it can only be determined whether the capacitor has a short circuit or whether it is being charged. A continuity test or a resistance measurement in the ohm range can be carried out for this.
What is a capacitor?

Capacitors are a passive electronic component that is used in almost all electrical devices. You can find them in computers, televisions, kitchen appliances, craft machines, vehicles and many other devices.
Basically, capacitors consist of two electrically conductive surfaces that are separated from one another by an insulating material. However, there are different types and shapes of capacitors. One of the best known is the electrolytic capacitor. It is a polarized capacitor. In contrast, ceramic capacitors, for example, are used as non-polarized capacitors. In the field of motor capacitors, starting capacitors are also used.
Since capacitors block direct current and pass alternating current on, they have different functions. In an alternating current circuit the capacitor is used as an alternating current resistor, in a direct current circuit it can store an electrical charge. This stored voltage is called electrical capacitance (C) and is measured in Farad (F).
Since electrolytic capacitors wear out over time, it may be necessary to check their functionality. You can measure a capacitor with the multimeter. There are two approaches: Do you just want to check the condition of the capacitor with the multimeter, or do you want to measure the exact capacitance of a capacitor?
Visual inspection
- Plastic housing: Is there an indefinable mass emerging somewhere on the housing? Does the housing have a crack or even a hole?
- Aluminum housing: is liquid leaking? Has the overpressure protection triggered?
If you can answer one of these questions with “Yes”, the capacitor is most likely defective.
In the following section, we introduce the various methods of testing a capacitor using a multimeter.
Functional test
A motor with a defective capacitor either hums before starting or starts with a clearly audible hum. These are clear signs of a loss of capacity and thus a defective capacitor.
You should be very careful with this type of test as there is a great risk of injury. Above all, never test saws or lawnmowers, in this way. Many people overestimate their reflexes and cannot take their fingers out of the danger area quickly enough when the engine suddenly starts. Unfortunately, many accidents with severed fingers speak for themselves here.
If the motor runs in the wrong direction, this can also indicate a defective capacitor. The same applies to a very slow or powerless start-up of the machine. If the machine is loaded, the speed drops very quickly in such a case. If your electric motor runs the wrong way round or runs out of power, a defective motor winding can also be to blame in addition to a defect in the capacitor.
1. How to test a capacitor without capacitance measurement
If only a simple multimeter without a function for capacitance measurement is available, then only the rough functionality of the capacitor or electrolytic capacitor (electrolytic capacitor) can be checked. Proceed as follows:
1. Expose the capacitor
First of all, the capacitor to be checked should be completely removed from the circuit. All contacts to the circuit must be removed and the poles of the capacitor made freely accessible.
2. Visually check the capacitor
Before the capacitor is measured with the multimeter, it should be visually checked for obvious damage. Pay attention to small bumps or fine cracks on the surface. Leaking fluids also indicate a defective capacitor that should be replaced.
3. Discharge capacitor
The next step is to ensure that the capacitor is completely discharged. To ensure that there is no residual current in the capacitor, it can be connected to a consumer such as a simple light bulb. In this way, all stored energy can be completely discharged.
4. Set the multimeter
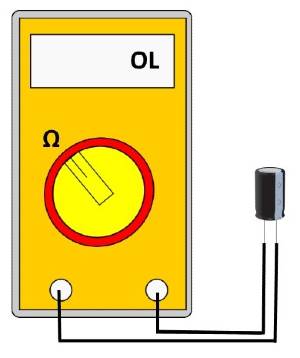
The multimeter should now be set to the resistance measurement function (measured values in ohms). A measuring range of 1000 ohms, i.e. 1 kilo ohms, must be selected so that usable results can be determined.
5. Measure the capacitor with a multimeter
Now the two measuring lines of the multimeter can be connected to the poles of the capacitor. For a complete test of the capacitor, the measuring lines must be applied twice and the reaction of both processes must be compared:
On the display of the digital multimeter, a measured value should now be shown for a fraction of a second that you have to remember. The measurement display will then immediately jump to OL (Open Line). If the measuring lines are removed and reconnected, the same measured value and then OL must appear on the display again. If this is the case, then the capacitor is OK.
2. How to a test a capacitor with a multimeter continuity tester
A continuity tester with diode test is integrated in many multimeter models. This can also be used to test a capacitor. In this way, however, it can only be determined whether a capacitor is being charged.
The current from the measuring device first flows into the capacitor until it is fully charged. The resistance measurement can then be carried out. The reading on the display then shows a continuously increasing measured value until the measuring range is left and only a 1 is displayed.
Continuity test with acoustic signal
Multimeters that have a continuity tester with an acoustic signal provide the following feedback:
- Acoustic signal continuously or not at all means the capacitor is defective.
- Acoustic signal changes in volume or pitch means the capacitor is ok.
With both variants, the capacitor can only be examined for a short circuit or the charging process can be checked. The exact capacitance of a capacitor cannot be measured in this way.
You should also consider that capacitors may react differently when they are removed than when they are built into a circuit. With small capacitors in the pF or nF range, measurements are definitely meaningful, but with larger capacitors from 10µF it becomes imprecise, since they behave differently during a measurement than in normal operation under real conditions. Measuring capacitors in a circuit, but this is more for professionals than hobby electricians.
Find out more about the exact procedure for carrying out a continuity test with a multimeter in the multimeter manual guide and find out everything you need to consider.
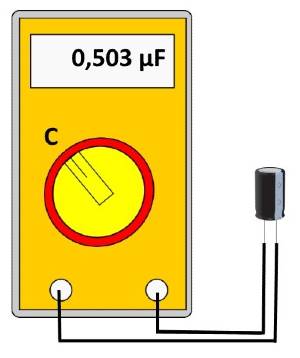
3. Using a multimeter with capacitance measurement
If a multimeter is available that has the capability to measure capacities, a direct capacitance measurement can be carried out on the capacitor or electrolytic capacitor (electrolytic capacitor). Proceed as follows:
1. Expose the capacitor
Here, too, the first thing to do is to completely remove the capacitor to be checked from the circuit. All contacts to the circuit must be removed and the two poles of the capacitor made freely accessible.
2. Visually check the capacitor
Before measuring the capacitance with the multimeter, the capacitor should be checked for damage. If the surface shows small bumps, fine cracks or even leaking liquids, this can indicate a defective capacitor.
3. Discharge capacitor
The next step is to ensure that the capacitor is completely discharged. In order to get all the residual current out of the capacitor, it can be connected to a consumer. Here, too, a light bulb, for example, is suitable to completely discharge the energy from the capacitor.
4. Set the multimeter
The multimeter should now be set to the capacitance measurement function (measured values in Farads). The measuring range is usually automatically adjusted here by the device.
5. Measure the capacitance of the capacitor with a multimeter
Now both measuring lines can be connected to the capacitor’s poles. The multimeter’s display should now show a reading that roughly corresponds to the value indicated on the capacitor. If the two values are very similar, the capacitor is in good condition. If the measured value determined is significantly lower than the value indicated on the capacitor or if no measured value is displayed at all, then the capacitor is defective and must be replaced.
General note:
Since capacitors or electrolytic capacitors store electrical current, they must be completely discharged before you can test the capacitor with the multimeter.
With simple multimeters you can only determine whether a capacitor has a short circuit or whether it is being charged. Exact measured values for the capacitance of a capacitor can only be determined with appropriately equipped measuring devices.
4. How to test a capacitor using an ohmmeter
You can also check the capacitor in an electric motor by measuring the resistance with an ohmmeter. In this measurement, the resistance should start low and gradually increase as the capacitor charges. The most meaningful of both measurement methods is the comparison with a definitely functioning motor capacitor with the same technical values. If the pointer deflections behave the same in terms of intensity and temporal progression, the capacitor is probably OK.
5. How to test a capacitor by short-circuiting it
In some situations, the condition of the electrolytic capacitor can only be checked without an ohmmeter or voltmeter if a suitable voltage source is available. The capacitor charges for 1-2 seconds. Then you need to close the contacts with a metal screwdriver.
A working capacitor should have a bright spark. If it’s dull or barely noticeable, it indicates that the capacitor is faulty and is not holding a charge well.