


Wet folding is exactly what it sounds like. Instead of folding paper when it is dry, the folder slightly dampens the paper. This allows the paper to be placed in different shapes that would not be possible in the dry state. Our guide shows origami wet folding tips that you can try yourself of help your children with. Also see other fun children’s projects in our crafts section.
Some people feel that wet folding is more of a form of sculpture than the folding of paper, since the appearance of the finished part is largely due to the hand manipulation of the paper after completion of the basic folds. Traditional origami is geometric, but wet wrinkles give the models a more organic look for some amazing origami art.
It might look like wet wrinkles produce origami, which is very fragile, but that’s not the case. Wet folded models are stronger and more durable than any other type of origami once the paper is completely dried. This makes wet folding ideal for people who want to create origami that can be exhibited for many years.
Origami wet folding tips: What types of models can I make?
If you’re looking for foldable origami charts, you won’t be very lucky. There are no specific models created for wet folding only. But top of the origami wet folding tips is that if you’re looking for a starter project where you fold wet, try to find a fairly simple model. Because you work with thick paper, you don’t want to fold anything that can have multiple layers.
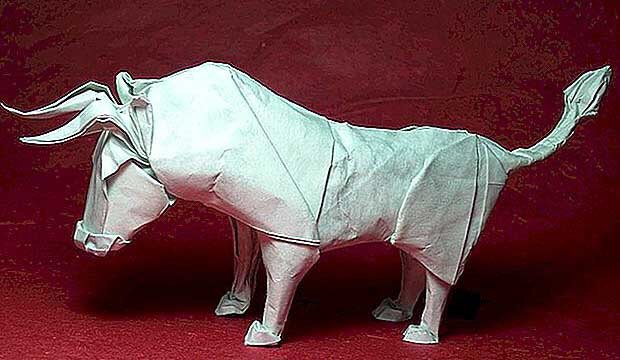
Wet folding is often used in the production of origami animals, as the technique adds curves and other details that give the model a more realistic appearance. You don’t have to limit yourself to folding only origami animals. Feel free to experiment and see what works best for you. Eric Joisel, for example, has folded several striking origami masks.
Origami wet folding: what you need
To fold wet paper, you need a small spray bottle filled with water and a cloth that allows you to distribute the water evenly on the paper.
Wet folding requires paper that is much thicker than normal origami paper. Wyndstone marble paper, which is sold in Europe under the name Zanders Elephant Hide, is a popular choice for wet folding origami models. The easiest paper option available is either watercolor paper or calligraphy parchment. Both types of paper should be in stock in every major craft shop.
If you want to wet a model that needs a different color on each side, you can try a technique known as back coating. That is, you glue two thin sheets of origami paper together with a water-soluble glue.
A self-healing cutting mat, a sharp cutter knife, a triangle and a ruler with metal edges are helpful if you need to cut your paper into a square before folding. However, if your paper needs to be cut, it is best to cut the paper into a square after steaming it. Machine paper has a grain that swells in wet conditions.
Wet folding: important factors
The most important thing to keep in mind when folding wet is that the paper should be only slightly moistened. Too much water causes the fibers to tear in the paper. Ideally, the paper should feel a bit like leather. If your paper looks shiny on the surface, it’s probably too wet.
With normal origami, most folders draw wrinkles with their fingernails or a bone folder. These sharp wrinkles should be avoided when wet folding. Fold with your fingertips and try to fold the model in the air instead of flat on the table.
You need to work fairly fast if you fold wet so that your model is ready before the paper dries. Therefore, this technique should be performed with models that you are already familiar with. Practice folding a model two or three times with normal origami paper before trying to make a wet folded version.
If you create a model with many layers, such as an origami dog, it can bulge or warp as you dry. You can prevent this by wrapping a rubber band around the model or by using a binder clip to keep it shape. Cover tape or drawing tape can also be used to keep smaller areas in place. When the model is completely dry, you can remove your reinforcements.