
Installing roof windows is the pinnacle in loft conversion. And the bigger they are, the more light they let in, so here is how to install a large skylight.
Do you have too small skylights? Then the solution of going for an extra large skylight is the answer. But beware: Although you can plan the lighting design that is so important for the roof space by installing roof windows, you should do so at least in parts with the professional – ie roofers or carpenters.
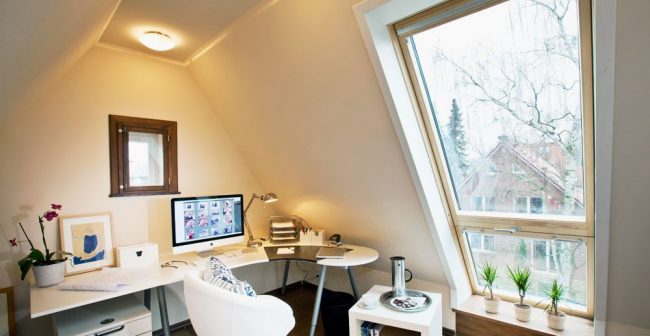
The “convertible skylight” in the image above with its dimensions of 94 x 225 cm is a true gateway for the daylight, and only its presence changes a roof space totally. Incidentally, the installation of a roof window, no matter what size, does not require approval.
The “convertible” installation is particularly tricky, because the window solution consists of two separately operable window units – one larger and one smaller – which can be folded out to a handsome mini-balcony. So let yourself be helped by the pro at the window installation. The rest, whether pre- or post-work, you can then confidently make yourself.
Install a large skylight: What should be considered during installation?
But there are a few pitfalls lurking: A gypsum board weighs between 10 and 12.5 kg per square meter, depending on the size of the roof, a couple of tons can ever come together. In principle, you should therefore examine your roof space with a structural engineer before starting the work, who will examine the condition and dimensions of the roof timbers. If this gives the green light, you can start. At least you’ll need a helper – you know, the plates are heavy.
Note: Removing insulating wool from the 70s is really not fun, especially because it is often laminated with all sorts of aluminum foil or other webs. But there you have to go! Of course, only with breathing mask against fiber dust. The good news: The modern mineral fiber mats and rollers for installation itch considerably less. Old insulation mats should be packed in special fiber bags for removal.
Install skylight: wood or plastic?
For the design of the roof window is the same as for other windows: Wood is beautiful, but easy to maintain, it must be sanded at regular intervals and re-provided with a protective coating. Especially the outside needs the best annual care.
Depending on the desired size of the window area, the U-value of 0.24 W / m2K required by the Energy Saving Ordinance for the total roof area can only be achieved with insulated window models. Triple glazing and the recessed installation are required.
Plastic, on the other hand, is almost unbreakable and now available in deceptively genuine wood look. PVC window frames are waterproof and maintenance-free, except for occasional cleaning with a damp cloth. Of course, both types of windows are also available in differently insulated versions, and you should not save money here.
Roof windows: replacement made easy
Roof windows, which were installed before 1991, can still be exchanged well. In addition, you can thereby improve your thermal insulation, your sun protection and your light output enormously. Manufacturers like Velux offer complete solutions that are also suitable for windows from other manufacturers.
On the inside of the wing you will find the type plate of your old roof window. Then you can see which window you can reorder or find out online on the manufacturer’s side, which is suitable as a replacement.
1. Install skylight: the preparations
Let’s go: In the first step, the roof opening is enlarged. To do this, you put the chainsaw on the roof skin.
An expert takes over the most important steps of the window installation. Especially when it comes to the work on the roof construction. The helping hand of the self-maker is in demand.
Remove inner lining. Remove the lining of the old window. Just as the windowsill, which no longer meets today’s installation rules.
2. Install skylight: insert the new window
In the continuous opening now the new window is fitted. New rafters and bills help. It’s not far to the fold-out mini-balcony.
3. Install skylight: interior trim
Creating the interior trim on your own is not as difficult as you might think. But the next step, like the whole project, is something for advanced do-it-yourselfers. The inner lining of the skylight is usually made of the same gypsum board as the rest of the planking. Some manufacturers also offer matching inner lining for their windows, which you still need to adapt to your circumstances.
As in our example: The “convertible” roof window contains prefabricated elements that can be adapted in a few steps to our roof pitch. The manual of the manufacturer is still very helpful, because the work is a bit tricky.
Note: A pendulum on the roof slope template from the manufacturer shows you the angle in which you have to cut off the side parts of the two inner linings. The angles are divided into different areas (1-4), which makes it easier to measure and cut.
4. Install skylight: assemble inner frame
Precise work is required when assembling the interior trim. When sawing and screwing, also approach with a little tact, the material is very thin and should not scratch. The counterparts to the already used clamps hit with the hammer in the marked places of the two side parts.
Important: skylights must be airtight
Especially in window reveals of roof windows often heat bridges, and the mold is sooner or later to the site. The reason for this is often a poor non-airtight connection of the vapor barrier film to the roof windows. Suitable for the window steam brake aprons offer you the opportunity to make the connection itself, but care is needed here. This is especially true when dealing with the cutter.